In this Houston Data Science meetup we will introduce our members to data science using the Python programming language.
- Install Python 3 and set up on your computer via the Anaconda distribution
- Install Git locally and create a Github account
- Develop Python programs in a text editor, IDE and Jupyter Notebook
- Use the command line to execute a program and run Python interactively
- Use Jupyter Notebook to explore the most popular data science libraries
- Have a huge list of resources to help you continue your data science journey
- Create a Github Account
- Install Git locally
- Fork and clone this respository
- Install Python 3 with Anaconda
- Run Python interactively
- Install Sublime Text 3 along with packages for enhancing development
- Install PyCharm EDU
- Execute basic programs from command line
- PyData
- NumPy
- pandas
- statsmodels
- matplotlib
- seaborn
- connect to sqlite
The page is currently being hosted on Github, a site that hosts remote Git repositories. Github is a popular place to share and collaborate on software projects. The most popular data science libraries are all hosted on Github. On Github, you can find the latest developments, track bugs and join the conversation with fellow developers.
- If you have not already done so, create a Github account now.
Git is a popular version control system used to keep track of file changes during software development. Github is a private company independent from Git. Git is free software that tracks your file changes on your local machine.
Let's install Git on your local machine
- Visit the Git downloads page and download Git for your operating system.
- After installing Git you will need to run a couple commands to link it to your github profile.
- Run the commands in the Your Identity in this link. The same commands are copied below.
git config --global user.name "John Doe"
git config --global user.email [email protected]
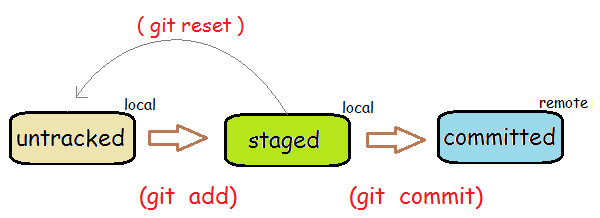
Whenever you are in position to make changes to someone elses project on Github you will need to fork the repository and then clone it to your local machine. After making changes you will commit your work locally and then push those changes back to Github where you will finally make a pull request so that the new changes may be incorporated into the project.
Let's go through this process now.
- At the very top of this repository, you will see a
Forkbutton. Click it and fork the repository. This makes an exact replica of the repository under your user profile.- Under your Github profile (not mine), again go the top of the page and look for the green
Clone or downloadbutton. Click it and copy the url.- On your local machine, create a new folder somewhere in your file system. Title it something like
Github Repos- Open up a terminal (Windows users open the program Git Bash)
- Run the command
git clone https://github.com/tdpetrou/Intro-to-Data-Science-with-Python.gitbut replace this URL with the one you copied from step 2.- You now have a replica of the repository on your local machine and are ready to make changes
- Staying in the terminal run the command
cd Intro-to-Data-Science-with-Python- Open up the README.md file in a text editor. That is this current file.
- Make a single edit to the file and save it. Add your name or something personal on the very top line.
- Go back to the terminal and run the command
git add README.md. Git is now tracking this file and it is in the staging area.- Run the command
git commit -m "your message here". Replace 'your message here' with something personal. All commits must have a message about what has changed.- The last command just took a snapshot of your repository and you can revert back to it now at any point in the future.
- Run the command
git push origin master. This will align your remote repository with your local repository.- Go back to your github profile and verify the changes.
- Towards the top of the page click the
New pull requestbutton.- Now I will get a notification that you are wanting to modify a file of mine. I can review the revisions and accept/reject your pull request.
Anaconda is by far the most popular distribution of the Python programming language for data scientists. Anaconda packages together all the popular data science libraries along with the package manager conda.
Anaconda is not a necessity. Python may be installed independently from source from Python.org along with its own package manager pip. But for begninners it is highly suggested to use Anaconda as the conda. You can read more about the differences Anaconda with conda and pip here.
Visit the Anaconda downloads page and install Anaconda with Python 3.6 for your operating system. Use the graphical installer. Anaconda comes packaged with a graphical user interface for beginning projects as well as the popular IDE Spyder.
Now that we have Anaconda installed we can begin to use Python.
There are many ways to run and write Python. Python can be written in any text editor, even the basic ones that come preinstalled with all operating systems. Sublime Text 3 is an enhanced text editor that is highly customizable to help make programming in Python easier.
Download and install Sublime Text 3 and open it.
Any programming language may be written in Sublime. To enhance the editing experience of sublime specifically for Python we first need to install the package control manager. There are 1000's of third party packages written for Sublime.
- Visit the Package Control website. All Sublime packages can be found here.
- Click the
install nowbutton and follow the instructions to install the package manager.
Now that you have the package manager you can begin to install packages. We will install the Anaconda Sublime package. This is completely independent of the Anaconda distribution, it just happens to have the same name. It adds code completion, linting, inline documentation and more. Visit the Anacond Sublime package home page for more info
- To access the package manager, you must first open up the
command palettewithcmd + shift + P. It is also found under Tools -> Command Palette.- In the text box that pops up, begin typing in the word
install. Click onPackage Control: Install Package- A new text box will open up with a huge list of available packages
- Type in 'Anaconda'. It should be the first option damnwidget.github.io/anaconda
Watch this video to get more in-depth tutorial on Sublime packages for Python.
pycharm https://www.jetbrains.com/pycharm-edu/ file -> new project -> educational choose python 3 interpreter
use jupyter notebook in pycharm: https://www.jetbrains.com/help/pycharm/using-ipython-jupyter-notebook-with-pycharm.html
Typical workflows for data scientists