Quickly learn how to setup
a Todo list management app
using Flutter and Riverpod
for app state management.
This is a simple Todo list application that allows you to track todo items that you create and edit. You can check your current active todo items, check the completed ones and also have an overview of every task you've created. Oh! And it's also fully tested! 😃
This app connects to an API
implemented with Phoenix
to persist the todo list items.
As we are focused on building our mvp,
we are looking to have the frontend counterpart
that is cross-platform and fastly iterable.
Setting this walkthrough will help you
understand better the fundamentals of having
an app with a robust state management library
that can be used in real-world applications.
It also helps us to have a detailed guide of a fully tested app that is documented and is something we can go back to. 😊
It's advisable to have a basic understanding
of the Dart-lang and of Flutter.
If this is your first tutorial with Flutter,
we highly advise you to check our
learning repositories to get started!
https://github.com/dwyl/learn-dart
https://github.com/dwyl/learn-flutter
If you want a walkthrough on two simpler applications, we highly recommend going through these in order so you can understand the ins and outs better.
- https://github.com/dwyl/flutter-counter-example
- https://github.com/dwyl/flutter-stopwatch-tutorial/pulls
This tutorial will sacrifice some setup steps that are found in the aforementioned, so make sure to check these out if you feel like you are lost or this is your first time using Flutter.
Right! Before building this app, let's check out the final result! After cloning this repository and traveling to the directory you cloned the repo in, run the following command to install the dependencies.
flutter pub getTo run the app, plug your phone or start the emulator and run the following.
flutter devicesIf you find the wanted device, run:
flutter runAnd you should get your app running!
If you want a more in-depth guide
of how to get a Flutter app running
on a real device or emulator,
check our learn-flutter
tutorial.
We will get you sorted in no time!
If you open the app, you should be able to see the following.
All the tests should also pass.
If you want to check this,
you can run flutter test.
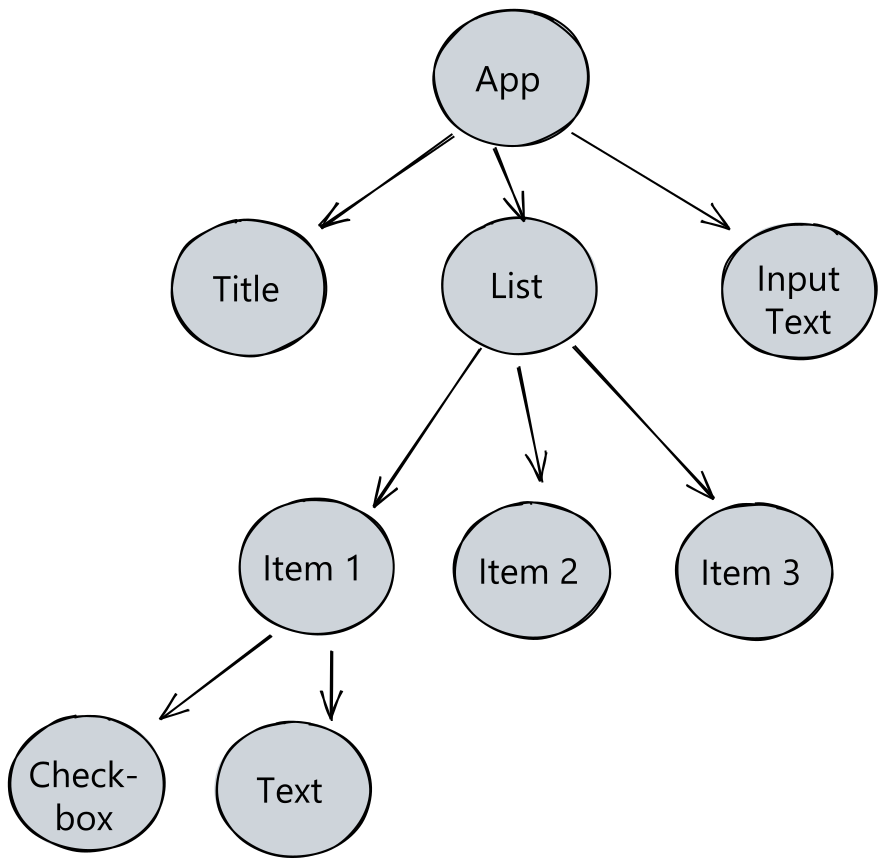
This app uses Riverpod
for state management inside the widget tree.
This library will allow us to declare
and use shared state from anywhere
and have a greater control on
UI rebuilds.
Here is how our widget tree will look like.
In this walkthrough we are going to use Visual Studio Code. We will assume you have this IDE installed, as well as the Flutter and Dart extensions installed.
After restarting Visual Studio Code,
let's create a new project!
Click on View > Command Palette,
type Flutter and click on Flutter: New Project.
It will ask you for a name of the new project.
We are going to name it "todo_app".
After generating the project,
let's now add all the needed
dependencies.
As it was stated before,
we are going to be using
Riverpod for state management and
accessing shared data across the widget tree.
Along side this library,
are going to also use
uuid
to generate ids for newly created todo items.
Additionally, we are going to use
flutter_hooks to make widget life-cycle management easier.
Head over to pubspec.yaml file
and add the following dependencies.
environment:
  sdk: ">=2.17.0 <3.0.0"
  flutter: ">=3.0.0"

dependencies:
  flutter:
    sdk: flutter

  cupertino_icons: ^1.0.2
  flutter_riverpod: ^2.0.2
  riverpod_annotation: ^1.0.4
  hooks_riverpod: ^2.1.1
  flutter_hooks: ^0.18.5+1
  uuid: ^3.0.6

dev_dependencies:
  flutter_test:
    sdk: flutter

  flutter_lints: ^2.0.0
  build_runner: ^2.3.2
  riverpod_generator: ^1.0.4
After adding these,
run flutter pub get to
fetch the dependencies.
We now have everything we need to start developing!