注:当前项目为 Serverless Devs 应用,由于应用中会存在需要初始化才可运行的变量(例如应用部署地区、函数名等等),所以不推荐直接 Clone 本仓库到本地进行部署或直接复制 s.yaml 使用,强烈推荐通过
s init ${模版名称}的方法或应用中心进行初始化,详情可参考部署 & 体验 。
阿里云可观测服务 Observable MCP Server
使用该项目,您需要有开通以下服务并拥有对应权限:
| 服务/业务 | 权限 | 相关文档 |
|---|---|---|
| 函数计算 | AliyunFCFullAccess | 帮助文档 计费文档 |
- 🔥 通过 云原生应用开发平台 CAP ,
该应用。

阿里云可观测 MCP服务,提供了一系列访问阿里云可观测各产品的工具能力,覆盖产品包含阿里云日志服务SLS、阿里云应用实时监控服务ARMS、阿里云云监控等,任意支持 MCP 协议的智能体助手都可快速接入。支持的产品如下:
为了确保 MCP Server 能够成功访问和操作您的阿里云可观测性资源,您需要配置以下权限:
-
阿里云访问密钥 (AccessKey):
- 服务运行需要有效的阿里云 AccessKey ID 和 AccessKey Secret。
- 获取和管理 AccessKey,请参考 阿里云 AccessKey 管理官方文档。
-
RAM 授权 (重要):
请务必关注以下安全事项和部署最佳实践:
-
密钥安全:
- 本 MCP Server 在运行时会使用您提供的 AccessKey 调用阿里云 OpenAPI,但不会以任何形式存储您的 AccessKey,也不会将其用于设计功能之外的任何其他用途。
-
访问控制 (关键):
- 当您选择通过 SSE (Server-Sent Events) 协议 访问 MCP Server 时,您必须自行负责该服务接入点的访问控制和安全防护。
- 强烈建议将 MCP Server 部署在内部网络或受信环境中,例如您的私有 VPC (Virtual Private Cloud) 内,避免直接暴露于公共互联网。
- 推荐的部署方式是使用阿里云函数计算 (FC),并配置其网络设置为仅 VPC 内访问,以实现网络层面的隔离和安全。
- 注意:切勿在没有任何身份验证或访问控制机制的情况下,将配置了您 AccessKey 的 MCP Server SSE 端点暴露在公共互联网上,这会带来极高的安全风险。
目前提供的 MCP 工具以阿里云日志服务为主,其他产品会陆续支持,工具详细如下(具体以实际版本支持为主):
-
增加 SLS 日志服务相关工具
sls_describe_logstore- 获取 SLS Logstore 的索引信息
sls_list_projects- 获取 SLS 项目列表
sls_list_logstores- 获取 SLS Logstore 列表
sls_describe_logstore- 获取 SLS Logstore 的索引信息
sls_execute_query- 执行SLS 日志查询
sls_translate_natural_language_to_query- 翻译自然语言为SLS 查询语句
-
增加 ARMS 应用实时监控服务相关工具
arms_search_apps- 搜索 ARMS 应用
arms_generate_trace_query- 根据自然语言生成 trace 查询语句
-
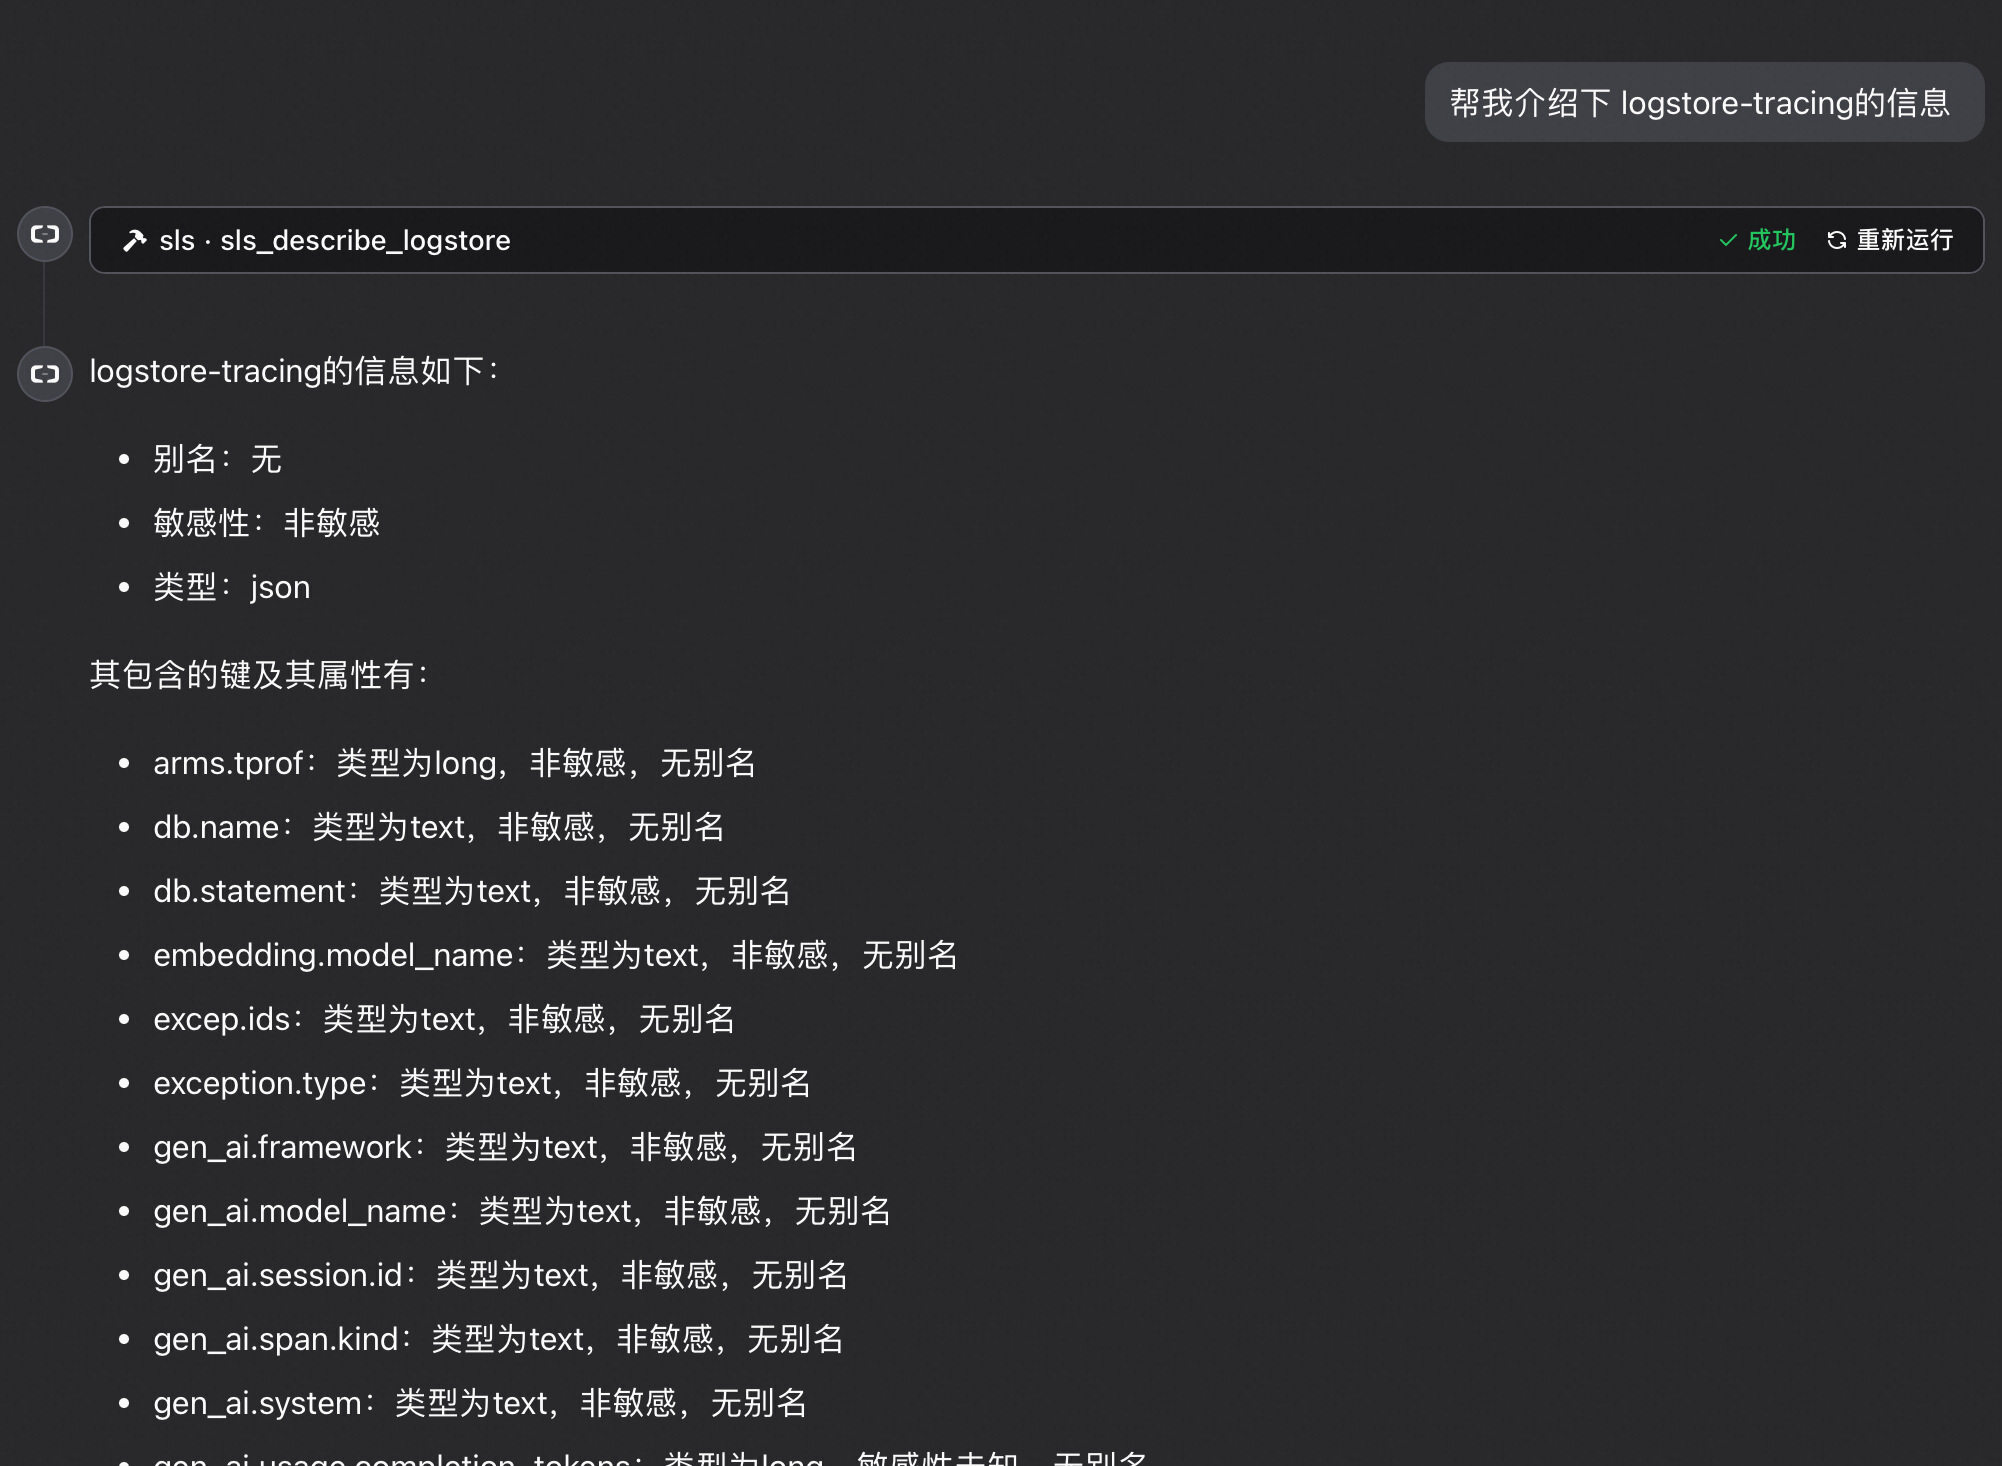
场景一: 快速查询某个 logstore 相关结构
- 使用工具:
sls_list_logstoressls_describe_logstore
- 使用工具:
-
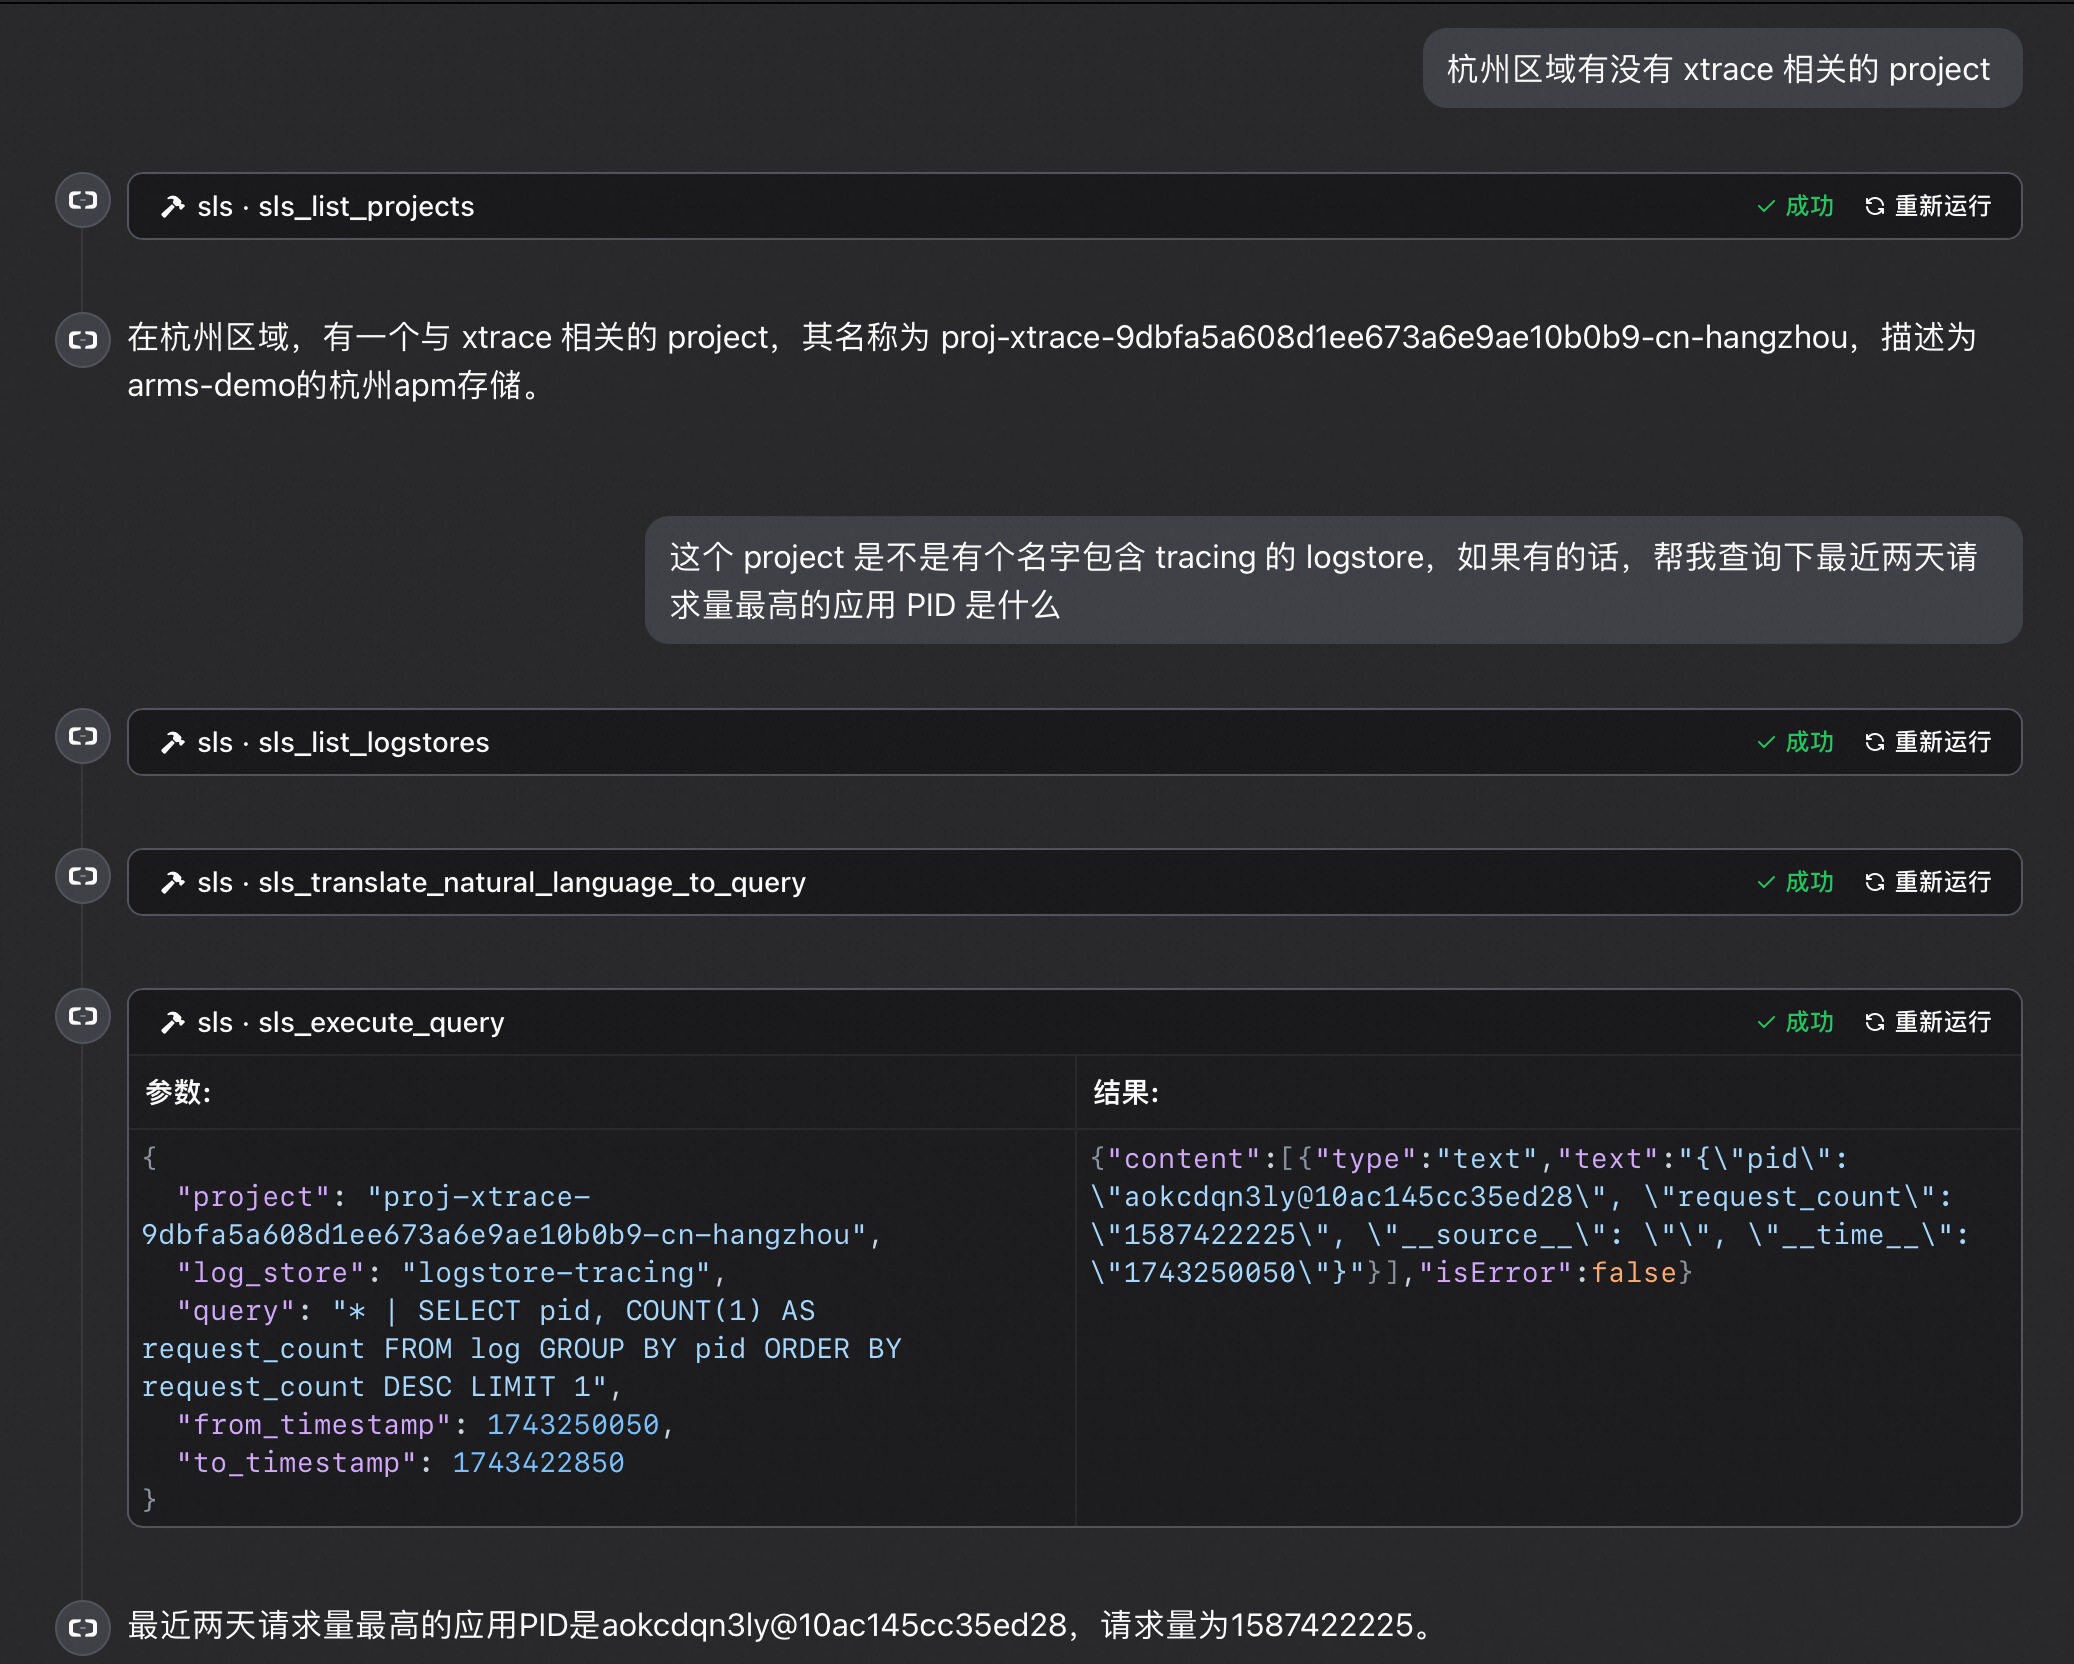
场景二: 模糊查询最近一天某个 logstore下面访问量最高的应用是什么
- 分析:
- 需要判断 logstore 是否存在
- 获取 logstore 相关结构
- 根据要求生成查询语句(对于语句用户可确认修改)
- 执行查询语句
- 根据查询结果生成响应
- 使用工具:
sls_list_logstoressls_describe_logstoresls_translate_natural_language_to_querysls_execute_query
- 分析:
-
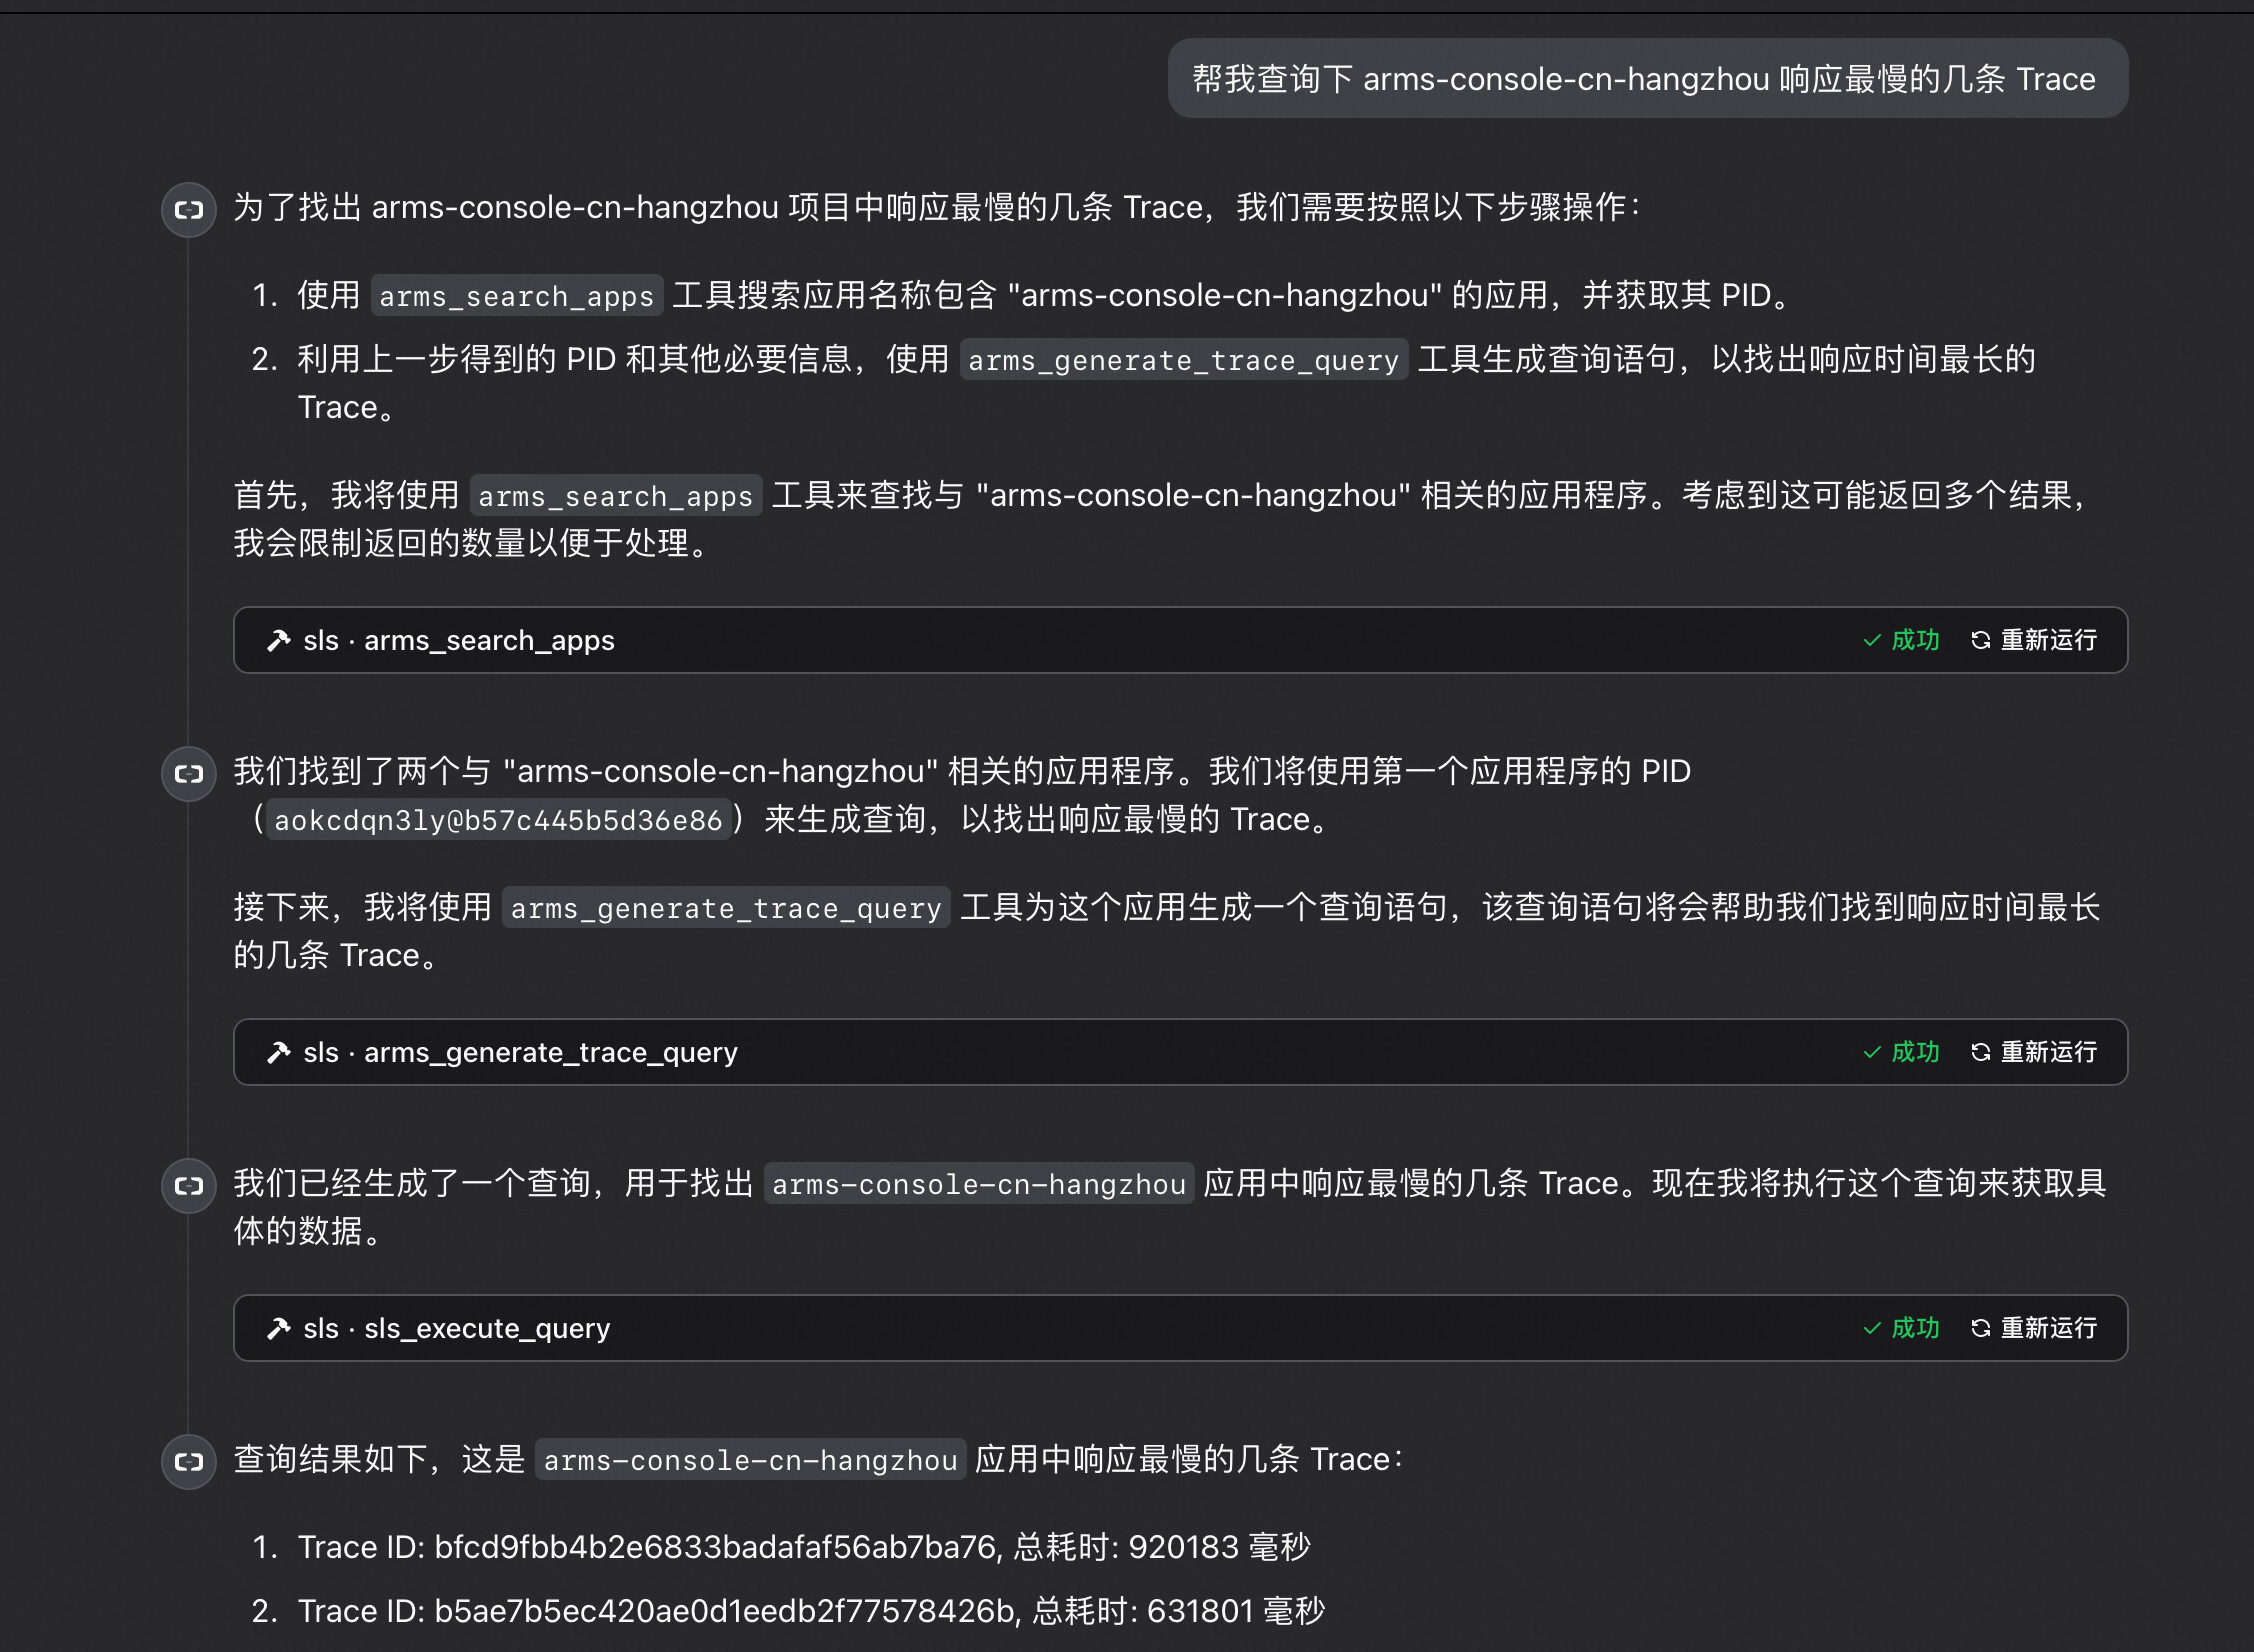
场景三: 查询 ARMS 某个应用下面响应最慢的几条 Trace
- 分析:
- 需要判断应用是否存在
- 获取应用相关结构
- 根据要求生成查询语句(对于语句用户可确认修改)
- 执行查询语句
- 根据查询结果生成响应
- 使用工具:
arms_search_appsarms_generate_trace_querysls_translate_natural_language_to_querysls_execute_query
- 分析:
When using uv no specific installation is needed. We will
use uvx to directly run mcp-server-time.
Alternatively you can install mcp-server-time via pip:
pip install mcp-server-timeAfter installation, you can run it as a script using:
python -m mcp_server_timeAdd to your Claude settings:
Using uvx
"mcpServers": {
  "time": {
    "command": "uvx",
    "args": ["mcp-server-time"]
  }
}
Using docker
"mcpServers": {
  "time": {
    "command": "docker",
    "args": ["run", "-i", "--rm", "mcp/time"]
  }
}
Using pip installation
"mcpServers": {
  "time": {
    "command": "python",
    "args": ["-m", "mcp_server_time"]
  }
}Add to your Zed settings.json:
Using uvx
"context_servers": [
  "mcp-server-time": {
    "command": "uvx",
    "args": ["mcp-server-time"]
  }
],
Using pip installation
"context_servers": {
  "mcp-server-time": {
    "command": "python",
    "args": ["-m", "mcp_server_time"]
  }
},By default, the server automatically detects your system's timezone. You can override this by adding the argument --local-timezone to the args list in the configuration.
Example:
{
  "command": "python",
  "args": ["-m", "mcp_server_time", "--local-timezone=America/New_York"]
}- Get current time:
{
  "name": "get_current_time",
  "arguments": {
    "timezone": "Europe/Warsaw"
  }
}
Response:
{
  "timezone": "Europe/Warsaw",
  "datetime": "2024-01-01T13:00:00+01:00",
  "is_dst": false
}- Convert time between timezones:
{
  "name": "convert_time",
  "arguments": {
    "source_timezone": "America/New_York",
    "time": "16:30",
    "target_timezone": "Asia/Tokyo"
  }
}
Response:
{
  "source": {
    "timezone": "America/New_York",
    "datetime": "2024-01-01T12:30:00-05:00",
    "is_dst": false
  },
  "target": {
    "timezone": "Asia/Tokyo",
    "datetime": "2024-01-01T12:30:00+09:00",
    "is_dst": false
  },
  "time_difference": "+13.0h",
}You can use the MCP inspector to debug the server. For uvx installations:
npx @modelcontextprotocol/inspector uvx mcp-server-timeOr if you've installed the package in a specific directory or are developing on it:
cd path/to/servers/src/time
npx @modelcontextprotocol/inspector uv run mcp-server-time- "What time is it now?" (will use system timezone)
- "What time is it in Tokyo?"
- "When it's 4 PM in New York, what time is it in London?"
- "Convert 9:30 AM Tokyo time to New York time"
Docker build:
cd src/time
docker build -t mcp/time .We encourage contributions to help expand and improve mcp-server-time. Whether you want to add new time-related tools, enhance existing functionality, or improve documentation, your input is valuable.
For examples of other MCP servers and implementation patterns, see: https://github.com/modelcontextprotocol/servers
Pull requests are welcome! Feel free to contribute new ideas, bug fixes, or enhancements to make mcp-server-time even more powerful and useful.
mcp-server-time is licensed under the MIT License. This means you are free to use, modify, and distribute the software, subject to the terms and conditions of the MIT License. For more details, please see the LICENSE file in the project repository.
部署完成拿到 URL 后,准备好支持 SSE 的 MCP Client,通过 SSETransport 进行连接。