本项目基于 running_page , workouts_page。进行了部分个性化改动,部署可参考原项目操作步骤。
git clone git@github.com:Sisyplone/workouts_page.git --depth=1pip3 install -r requirements.txt
npm install -g corepack && corepack enable && pnpm install
pnpm develop访问 http://localhost:5173/ 查看
生成数据展示
感兴趣的同学可以改下方参数 (--special-distance 10 --special-distance2 20, 10km~20km 展示为 special-color1 20km 以上展示为 special-color2, --min-distance 10.0 用来筛选 10km 以上的)
python3(python) run_page/gen_svg.py --from-db --title "${{ env.TITLE }}" --type github --athlete "${{ env.ATHLETE }}" --special-distance 10 --special-distance2 20 --special-color yellow --special-color2 red --output assets/github.svg --use-localtime --min-distance 0.5python3(python) run_page/gen_svg.py --from-db --title "${{ env.TITLE_GRID }}" --type grid --athlete "${{ env.ATHLETE }}" --output assets/grid.svg --min-distance 10.0 --special-color yellow --special-color2 red --special-distance 20 --special-distance2 40 --use-localtime生成年度环形数据
python3(python) run_page/gen_svg.py --from-db --type circular --use-localtime更多展示效果参见: https://github.com/flopp/GpxTrackPoster
在仓库目录下找到
src/static/site-metadata.ts,找到以下内容并修改成你自己想要的。
const data: ISiteMetadataResult = {
  siteTitle: 'Workouts Page',
  siteUrl: 'https://sisyplone.github.io/running_page',
  logo: 'https://encrypted-tbn0.gstatic.com/images?q=tbn:ANd9GcQTtc69JxHNcmN1ETpMUX4dozAgAN6iPjWalQ&usqp=CAU',
  description: 'Personal site and blog',
  navLinks: [
    {
      name: 'About',
      url: 'https://github.com/Sisyplone/running_page/blob/master/README-CN.md',
    },
  ],
};修改
src/utils/const.ts:
// styling: 关闭虚线:设置为 `false`
const USE_DASH_LINE = true;
// styling: 透明度:[0, 1]
const LINE_OPACITY = 0.4;
// update for now 2024/11/17 the privacy mode is true
// styling: 开启隐私模式(不显示地图仅显示轨迹): 设置为 `true`
// 注意:此配置仅影响页面显示,数据保护请参考下方的 "隐私保护"
const PRIVACY_MODE = true;
// update for now 2024/11/17 the lights on default is false
// styling: 默认关灯: 设置为 `false`, 仅在隐私模式关闭时生效(`PRIVACY_MODE` = false)
const LIGHTS_ON = false;修改以下环境变量
# 忽略每个 polyline 的起点和终点的长度(单位:米)。
IGNORE_START_END_RANGE = 200

# 忽略下面 polyline 中每个点的距离的圆圈(单位:米)。
IGNORE_RANGE = 200

# 包含要忽略的点的折线。
IGNORE_POLYLINE = ktjrFoemeU~IorGq}DeB

# 在保存到数据库之前进行过滤,你会丢失一些数据,但可以保护你的隐私,如果你使用的是公共仓库,建议设置为 1。不设置可关闭。
IGNORE_BEFORE_SAVING = 1部署到 GitHub Pages
-
进入仓库的 "Settings -> GitHub Pages -> Source",选择 "GitHub Actions"
-
进入仓库的 "Actions -> Workflows -> All Workflows",选择左侧面板的 "Run Data Sync",然后点击 "Run workflow"
- "Run Data Sync" 将更新数据,然后触发 "Publish GitHub Pages" 工作流
- 确认工作流运行没有错误
- 打开网站检查结果
- 如果网站没有反映最新数据,请使用“F5”刷新页面
- 某些浏览器 (比如 Chrome) 可能缓存网页不刷新,您需要使用 Ctrl+F5 (Windows) 或 Shift+Cmd+r (Mac) 强制清除缓存并重新加载页面
-
为 GitHub Actions 添加代码提交权限,访问仓库的
Settings > Actions > General页面,找到Workflow permissions的设置项,将选项配置为Read and write permissions,支持 CI 将运动数据更新后提交到仓库中。 -
如果想把你的 running_page 部署在 xxx.github.io 而不是 xxx.github.io/run_page 亦或是想要添加自定义域名于 GitHub Pages,需要做三点
- 修改你的 fork 的 running_page 仓库改名为 xxx.github.io, xxx 是你 github 的 username
- 修改 gh-pages.yml 中的 Build 模块,删除
${{ github.event.repository.name }}改为run: PATH_PREFIX=/ pnpm build即可 - 修改 src/static/site-metadata.ts 中
siteUrl: ''或是添加你的自定义域名,siteUrl: '[your_own_domain]', 即可
修改 Actions 配置文件 .github/workflows/run_data_sync.yml
Actions配置文件
1. 修改环境变量 env 下的配置,所使用的 apptype 以及 SVG 统计图中的个人 info-
在
Settings > Secrets and variables > Action中增加 secret根据你所使用的 apptype 添加相应的参数
具体的参数可以查看 Actions 的配置文件中 apptype 相应的执行语句
把数据文件放在 GitHub Cache 中
run_data_sync.yml 中的 SAVE_DATA_IN_GITHUB_CACHE 设置为 true 时,可以把脚本抓取和中间产生的数据文件放到 GitHub Actions Cache 中。这样可以让你的 GitHub commit 历史和目录保持干净。
如果你用 GitHub Pages 部署建议把这个值设置成 true。
获取 Strava 数据
-
注册/登陆 Strava 账号
-
登陆成功后打开 Strava Developers -> Create & Manage Your App
-
创建
My API Application输入下列信息: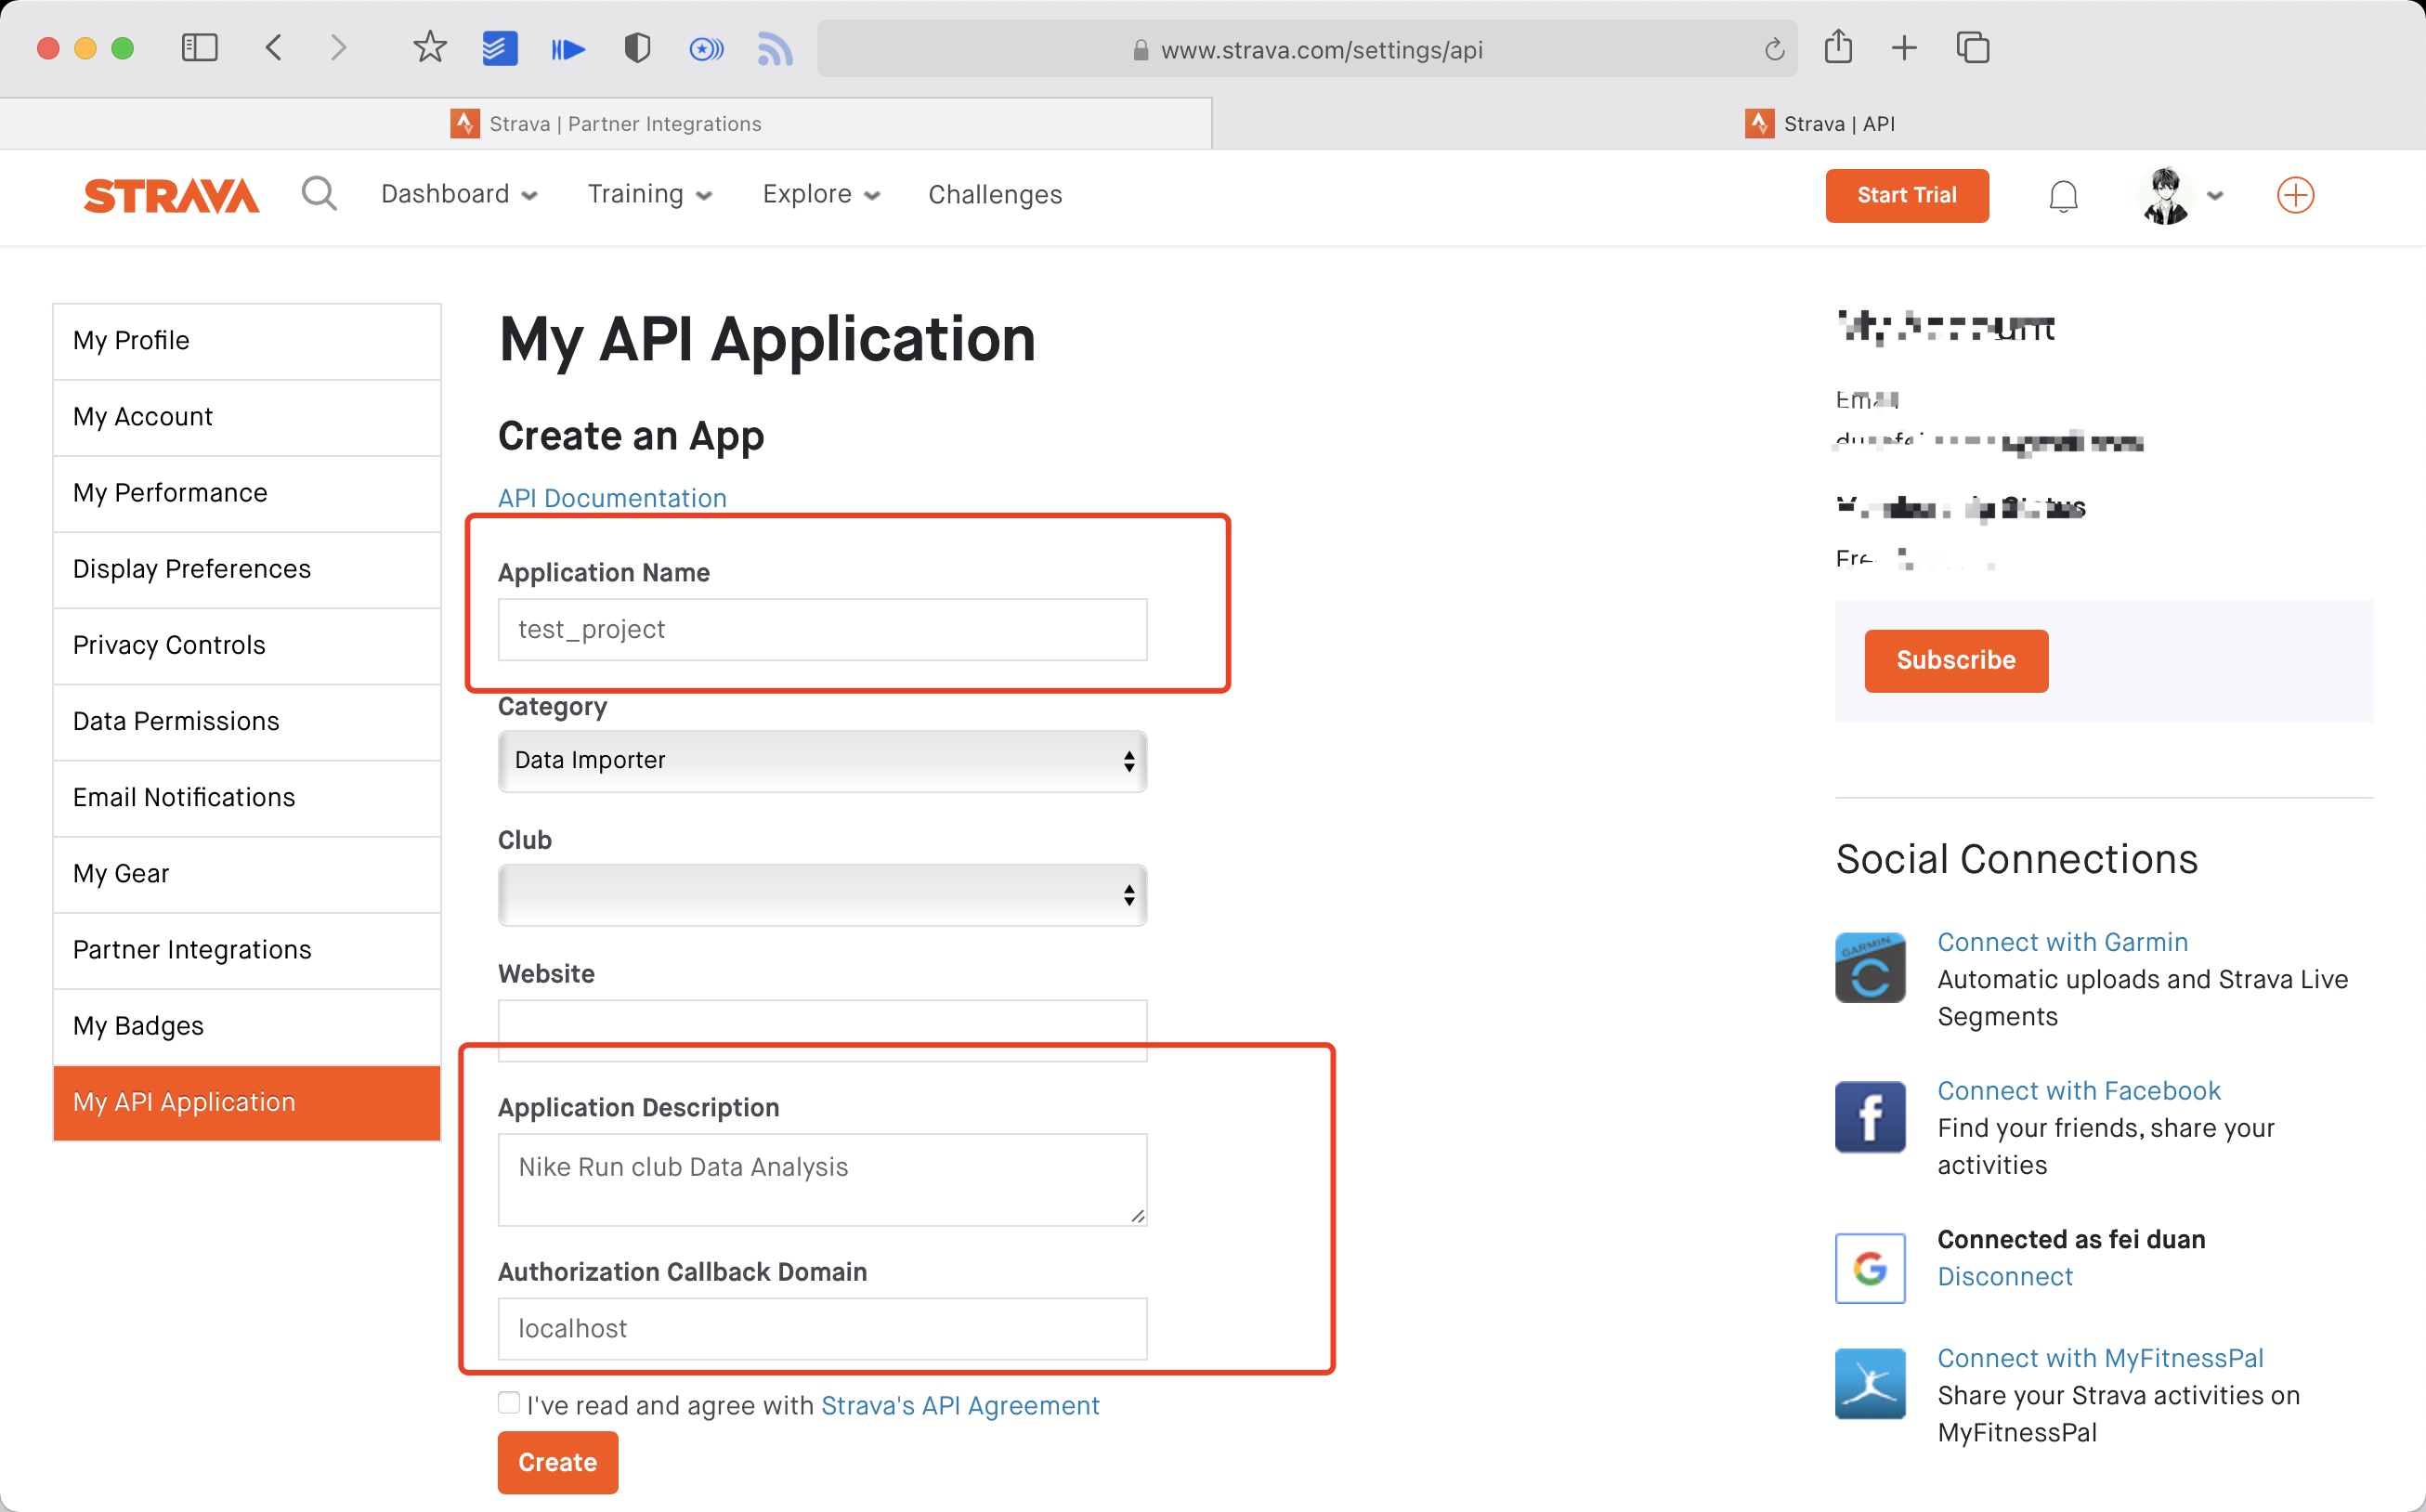 创建成功:
创建成功:

-
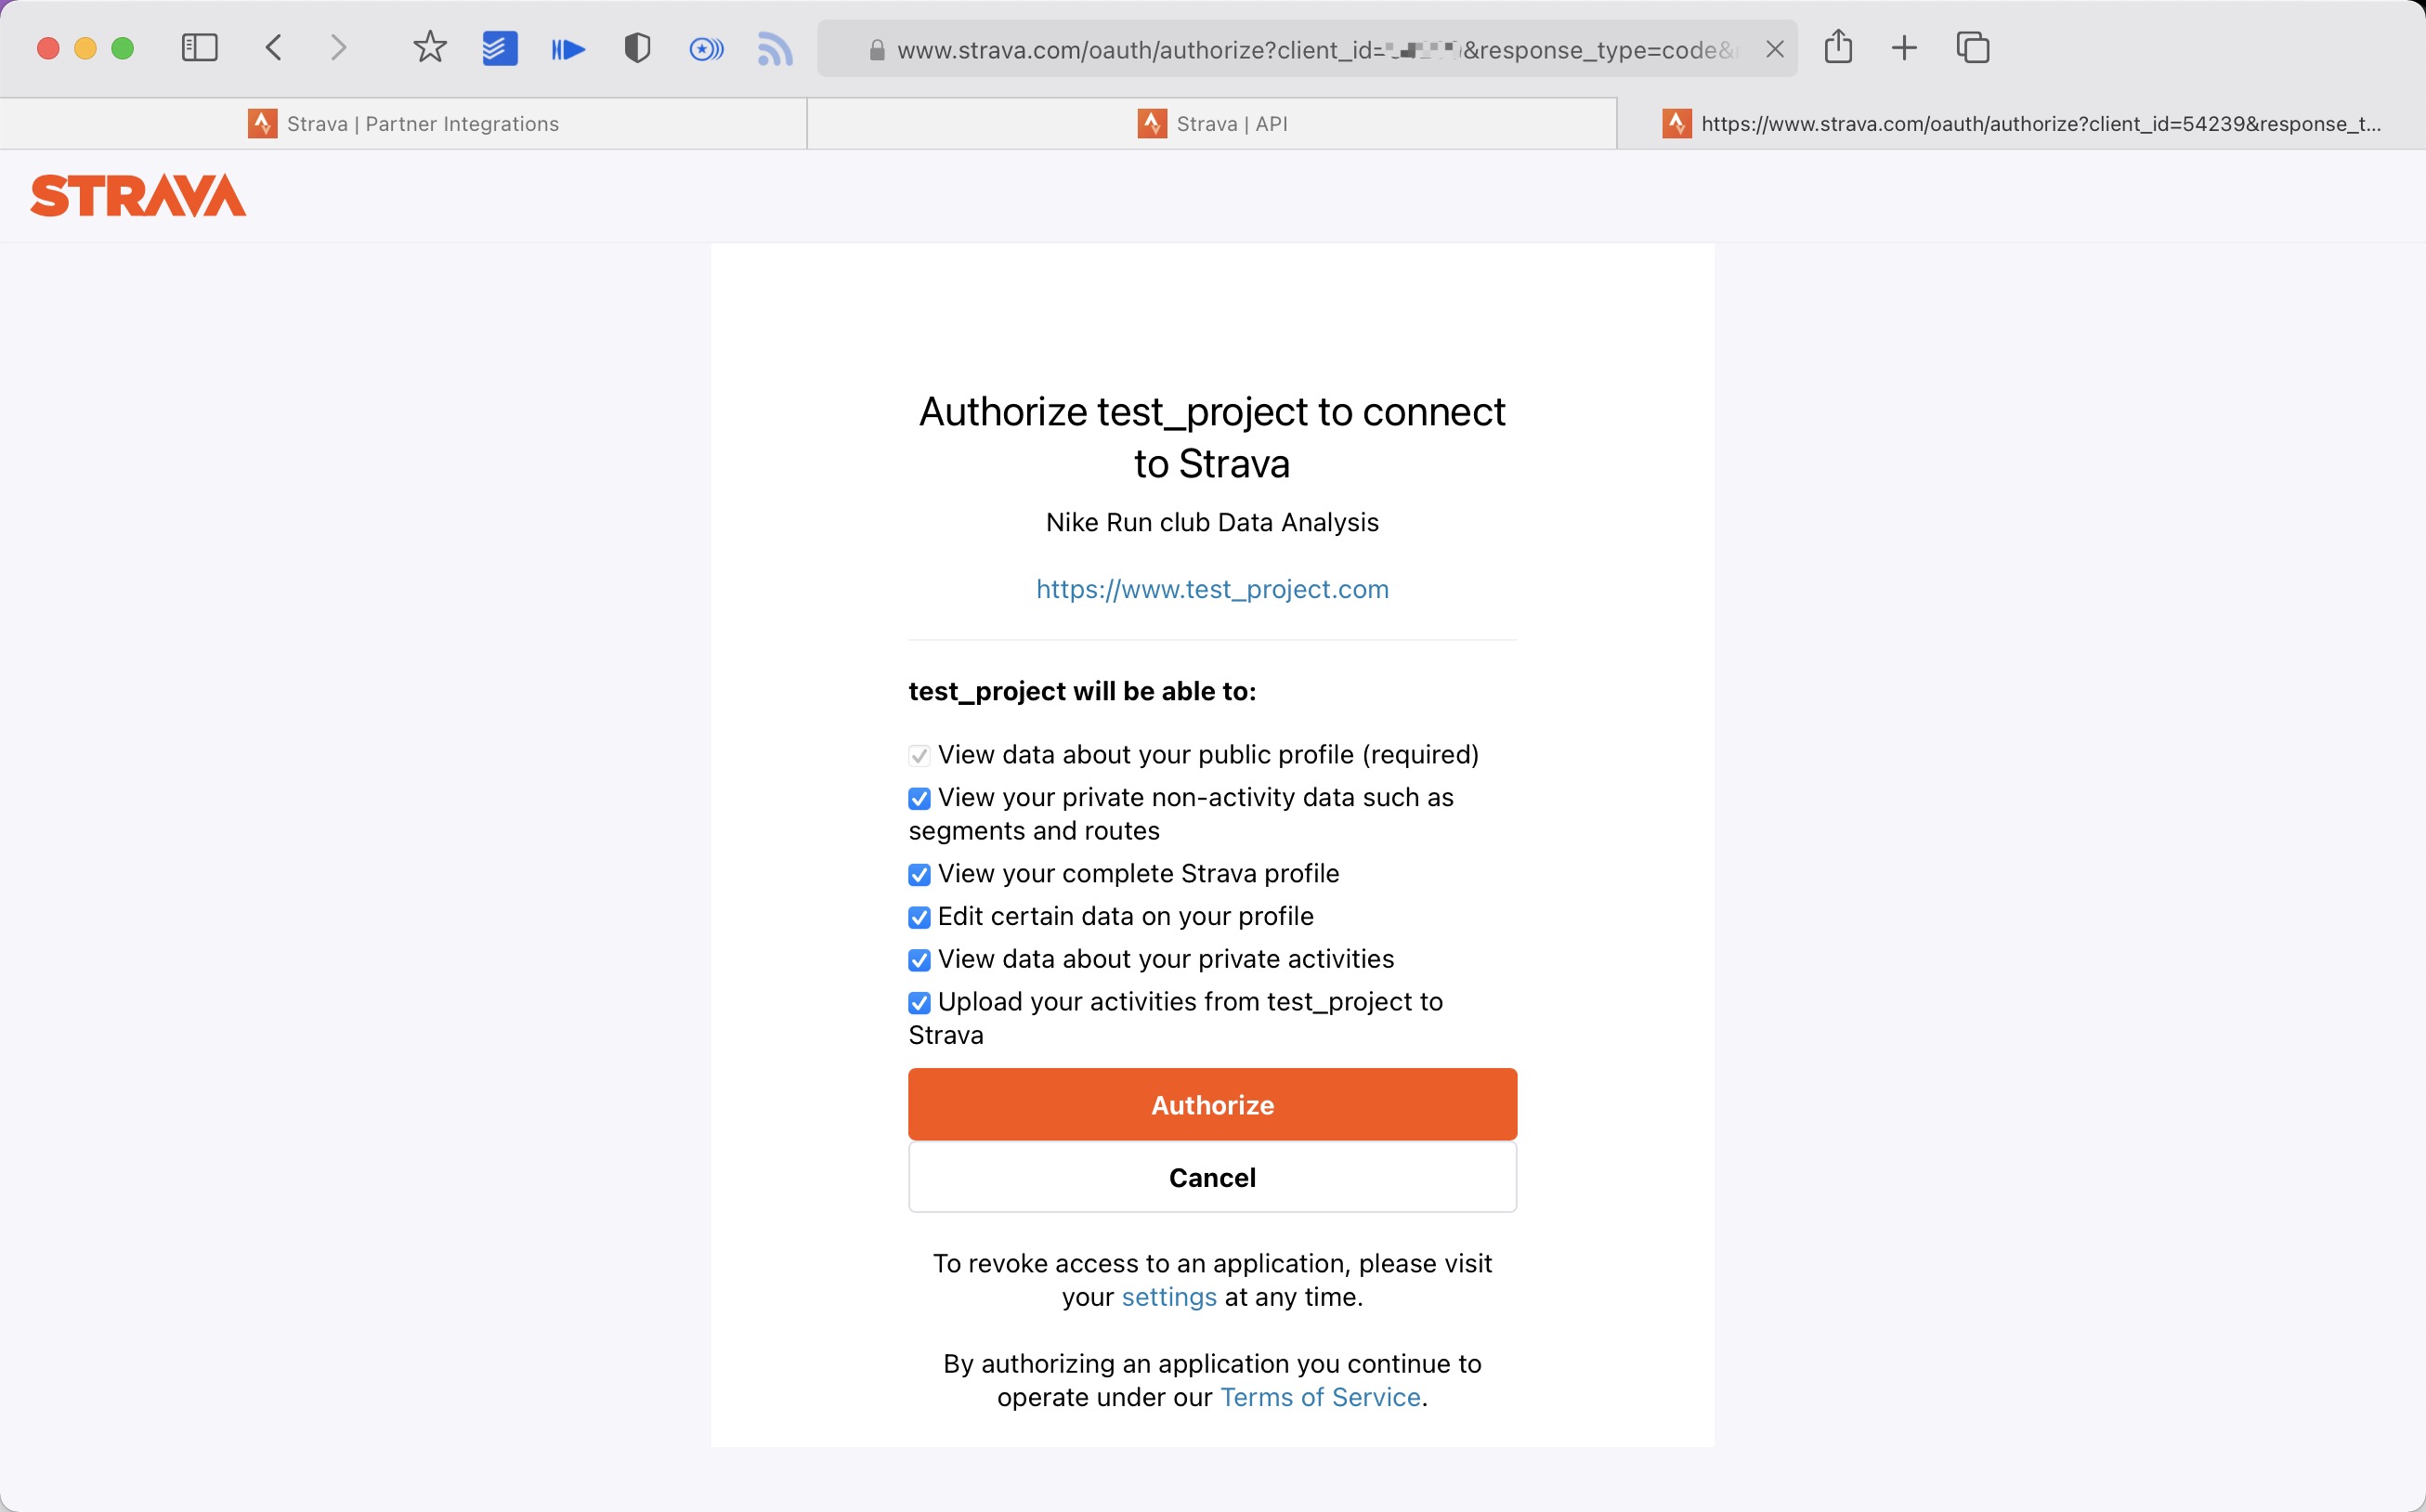
使用以下链接请求所有权限 将 ${your_id} 替换为 My API Application 中的 Client ID 后访问完整链接
https://www.strava.com/oauth/authorize?client_id=${your_id}&response_type=code&redirect_uri=http://localhost/exchange_token&approval_prompt=force&scope=read_all,profile:read_all,activity:read_all,profile:write,activity:write
Example:
https://www.strava.com/oauth/authorize?client_id=115321&response_type=code&redirect_uri=http://localhost/exchange_token&approval_prompt=force&scope=read_all,profile:read_all,activity:read_all,profile:write,activity:write
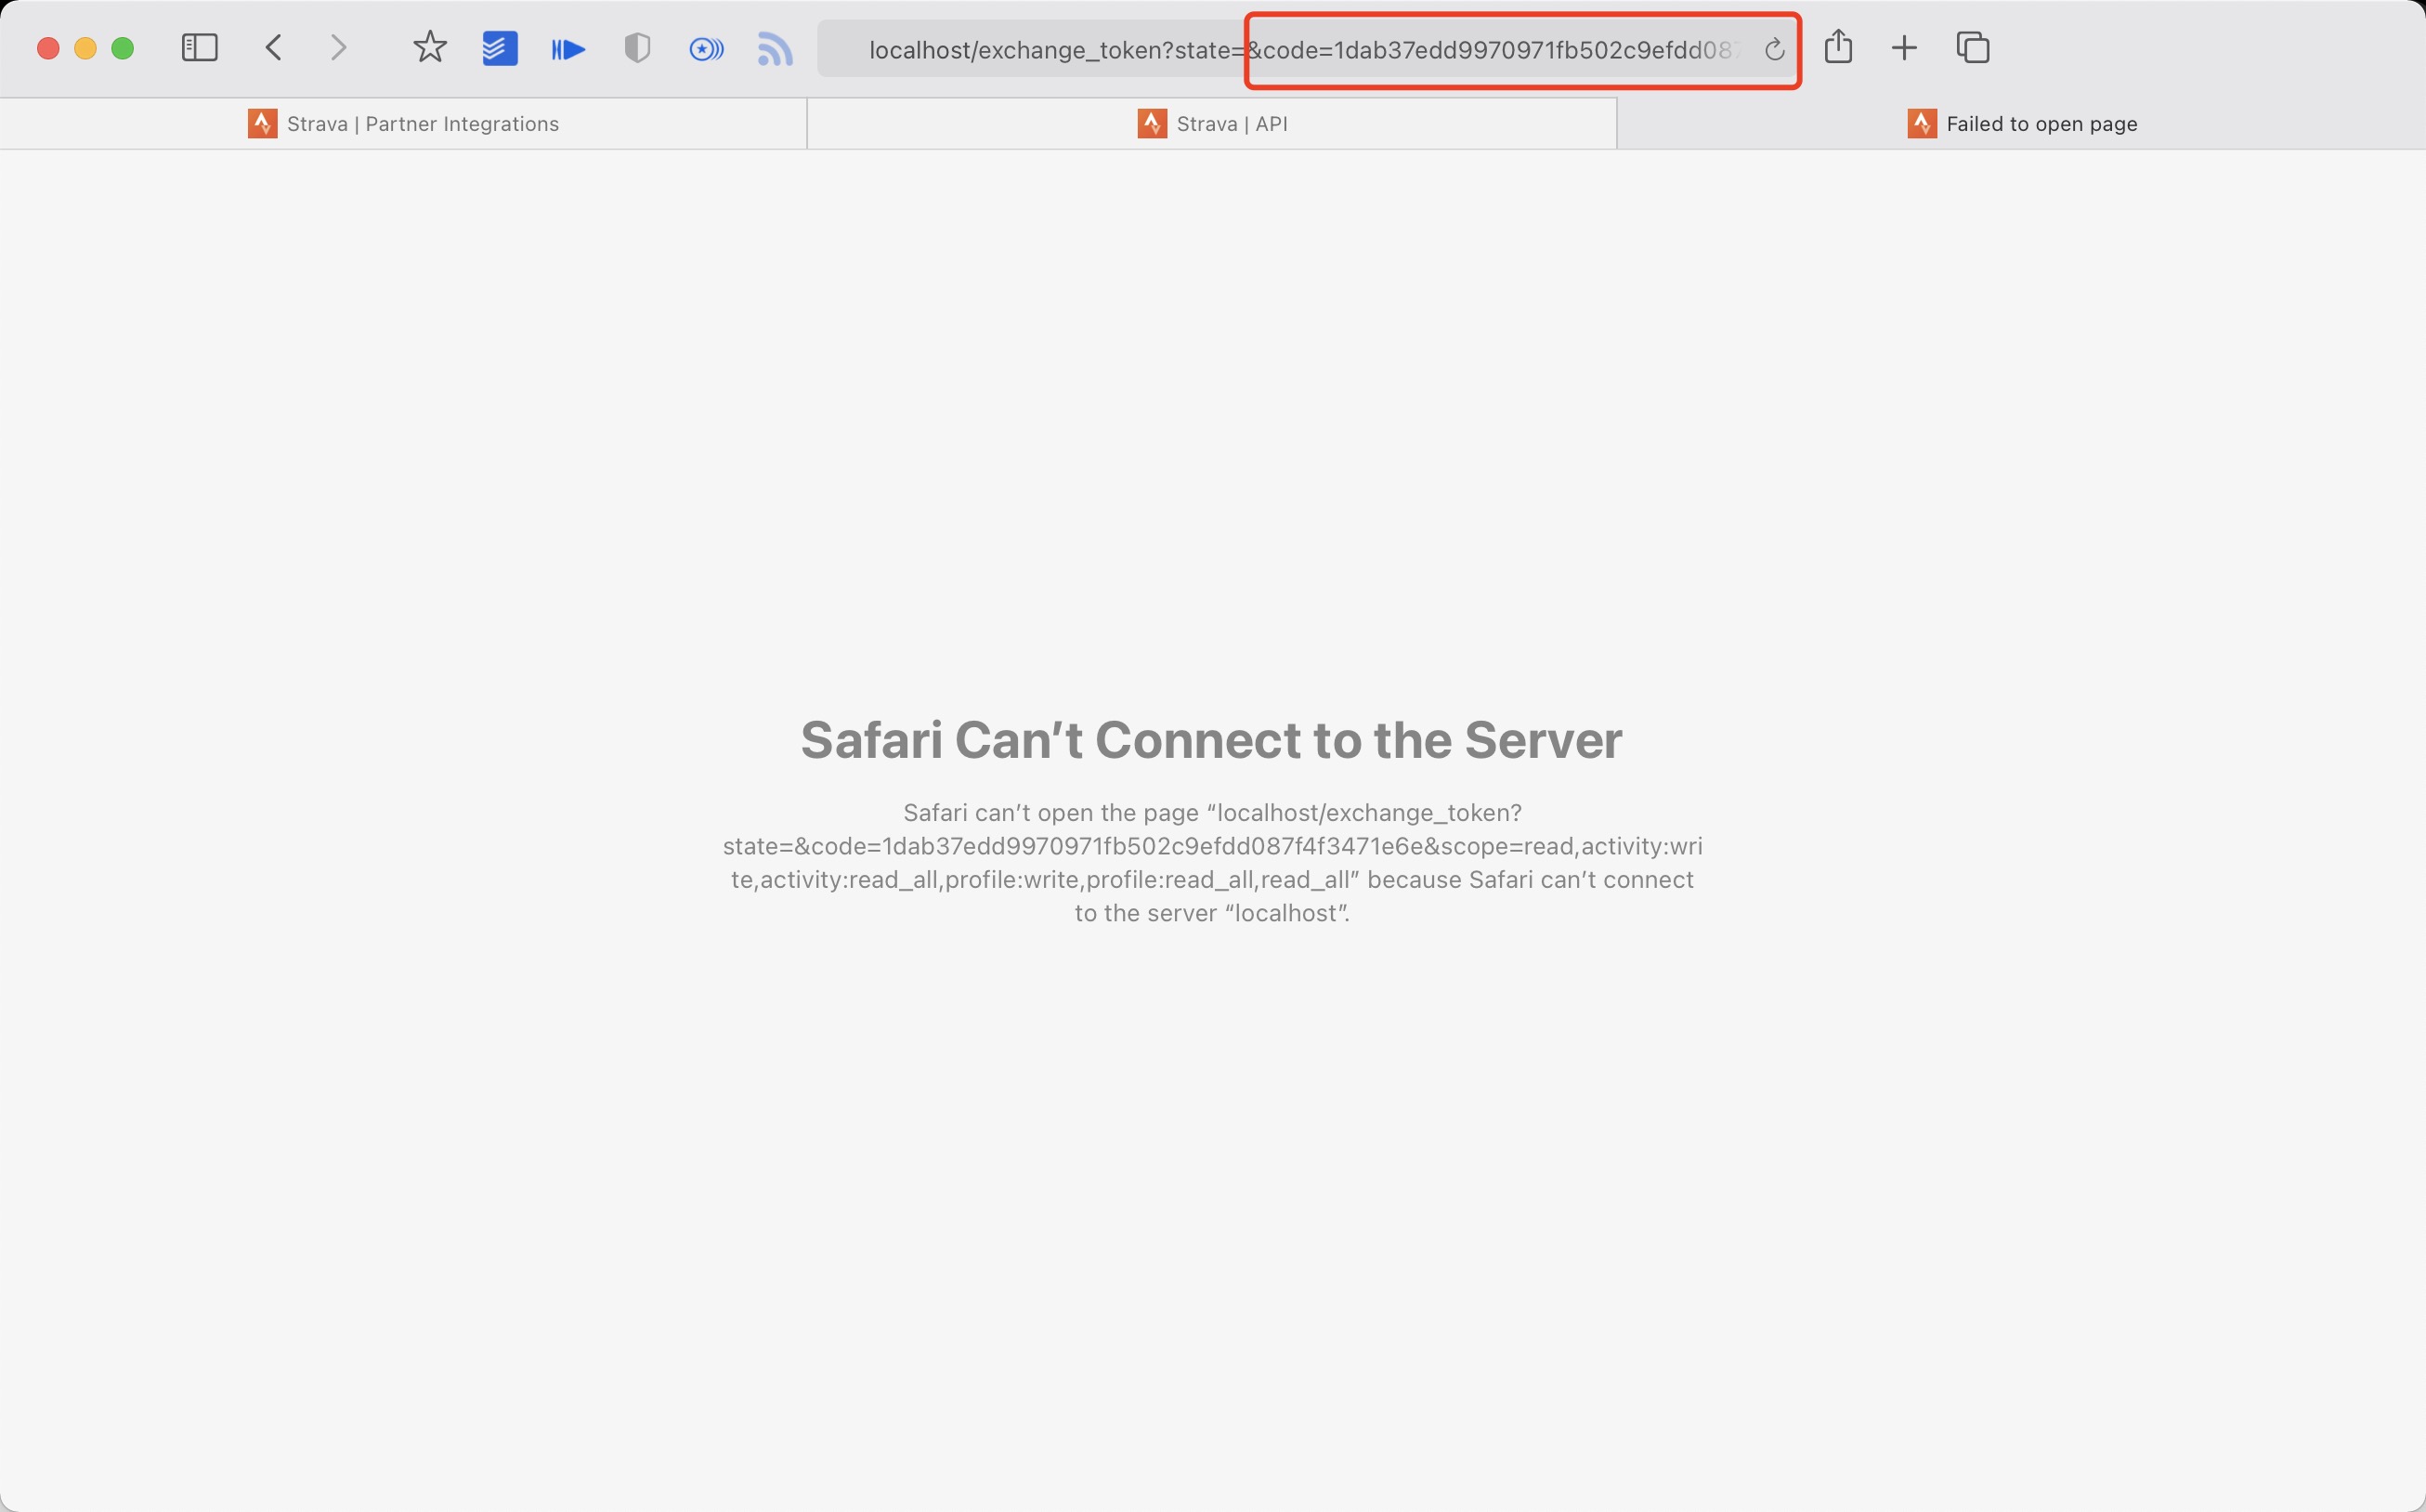
- 提取授权后返回链接中的 code 值 例如:
http://localhost/exchange_token?state=&code=1dab37edd9970971fb502c9efdd087f4f3471e6e&scope=read,activity:write,activity:read_all,profile:write,profile:read_all,read_all
code 数值为:
1dab37edd9970971fb502c9efdd087f4f3471e6
- 使用 Client_id、Client_secret、Code 请求 refresh_token
在终端/iTerm中执行:
curl -X POST https://www.strava.com/oauth/token \
-F client_id=${Your Client ID} \
-F client_secret=${Your Client Secret} \
-F code=${Your Code} \
-F grant_type=authorization_code
示例:
curl -X POST https://www.strava.com/oauth/token \
-F client_id=12345 \
-F client_secret=b21******d0bfb377998ed1ac3b0 \
-F code=d09******b58abface48003 \
-F grant_type=authorization_code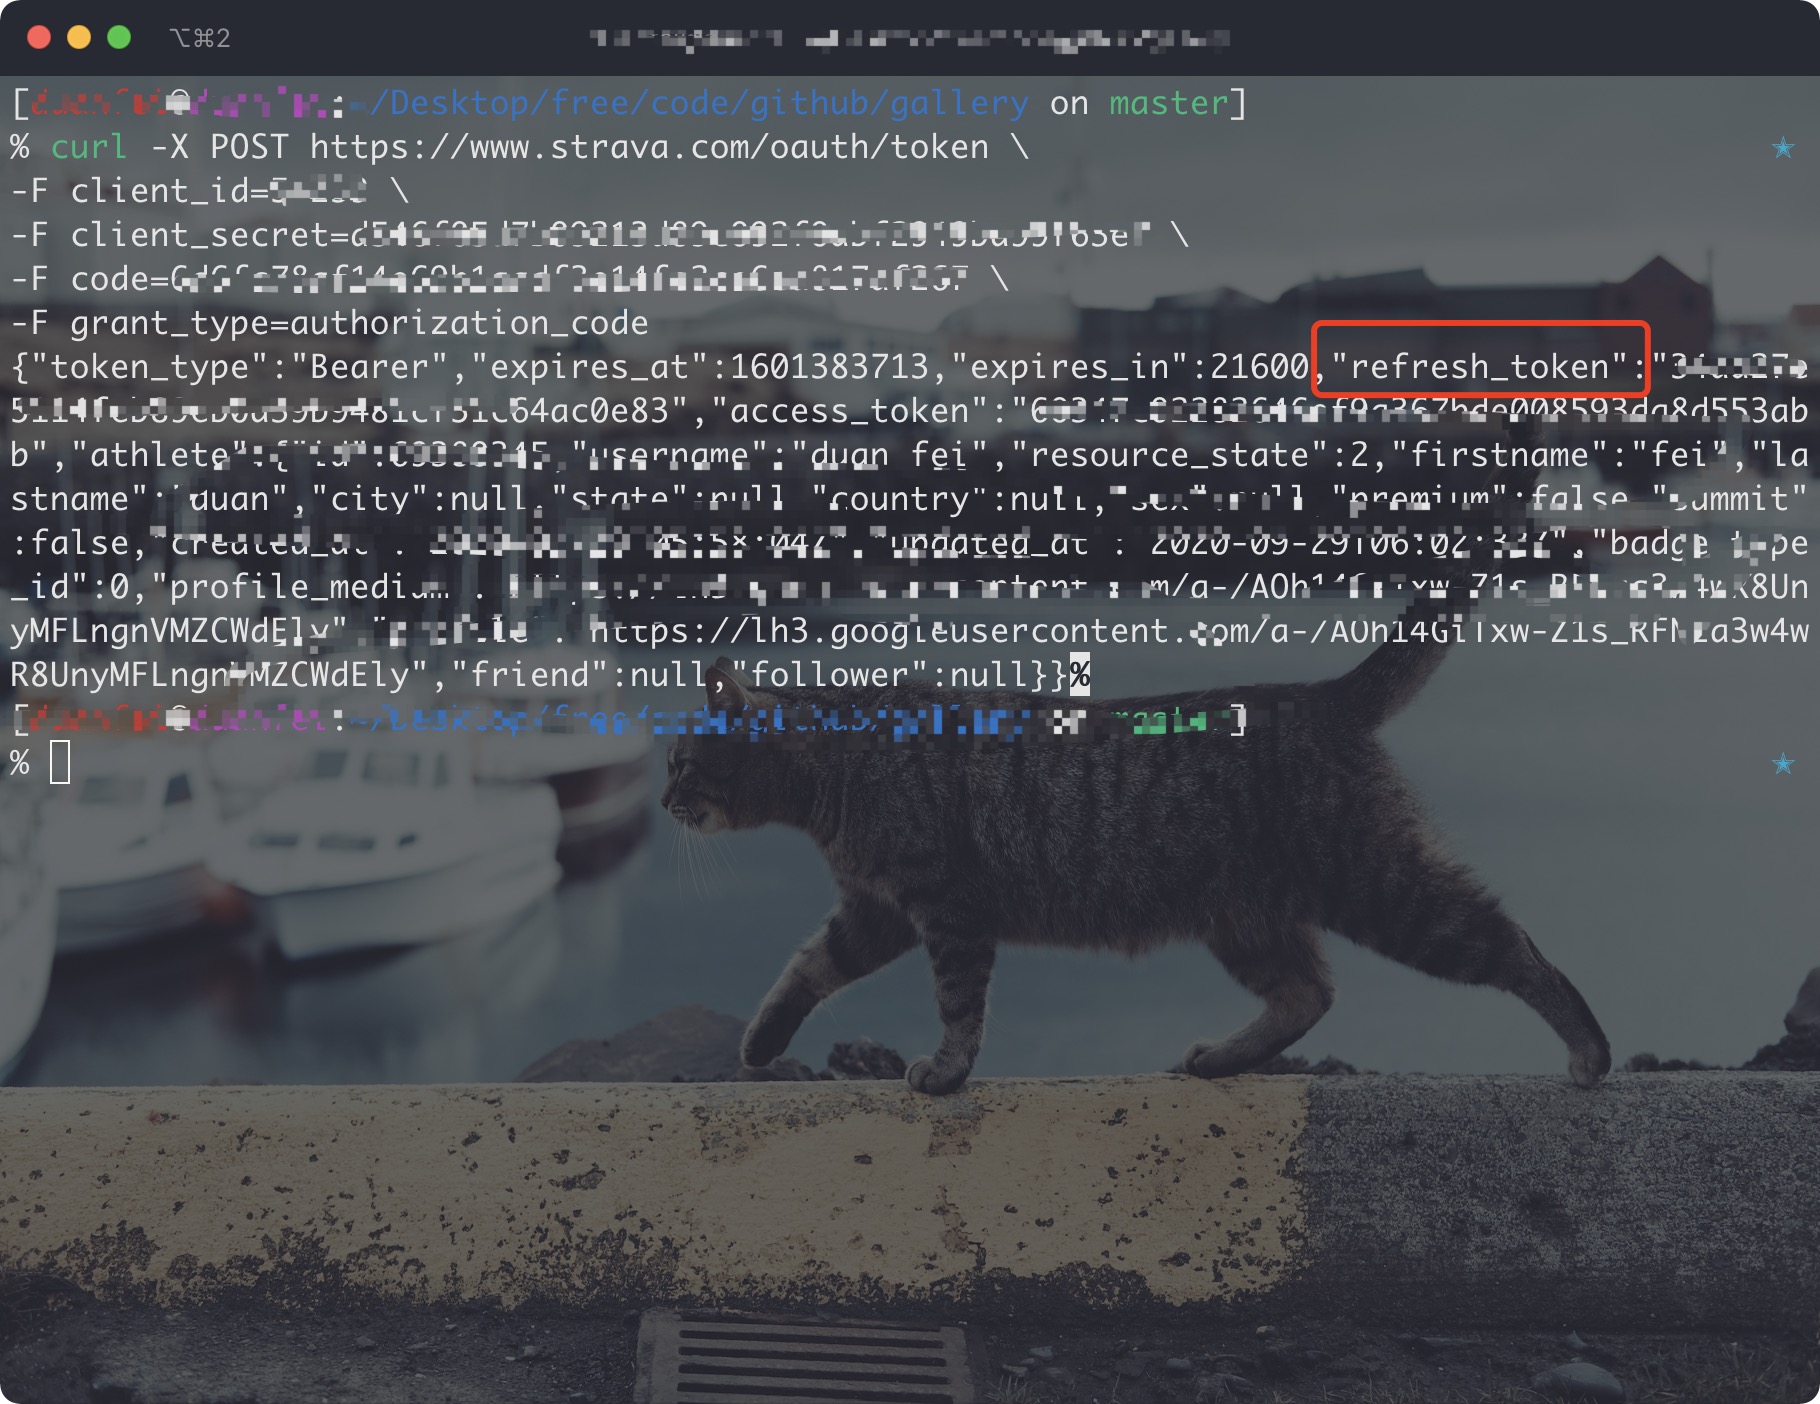
保存参数:client_id、client_secret、refresh_token
- 同步Strava数据至本地, 在项目根目录执行:
python3(python) run_page/strava_sync.py ${client_id} ${client_secret} ${refresh_token} false第一次同步 Strava 数据时,在最后传参 true 获取全部数据
如仅需跑步数据时,添加参数 --only-run
其他资料参见 https://developers.strava.com/docs/getting-started https://github.com/barrald/strava-uploader https://github.com/strava/go.strava
-
Strava 100 每 15 分钟的请求,1000 每日限制
https://www.strava.com/settings/api https://developers.strava.com/docs/#rate-limiting
等待时间限制(这里是 strava 接口请求限制),不要关闭终端,这里会自动执行下一组上传数据
Strava API Rate Limit Exceeded. Retry after 100 seconds
Strava API Rate Limit Timeout. Retry in 799.491622 seconds