Rapid, transparent, open-source tool for analyzing 19-channel EEG recordings with support for Eyes-Open (EO) and Eyes-Closed (EC) conditions.
Watch the full demo on YouTube
- EDF (European Data Format) - Standard clinical EEG format with 19-channel 10-20 montage validation
- CSV Format - Support for Divergence/Flex device recordings with automatic timestamp detection
- Real-time waveform display with per-channel rendering
- Adjustable gain, time scale, and highpass/lowpass/notch filters
- Time slider for quick navigation across the recording
- Channel selection for focused review
- Draw artifact regions directly on the EEG waveform
- Annotations persist across sessions (stored in database)
- Add artifact, event, or note annotations with start/end times
- Remove annotations individually
- ICA (Automatic) - Independent Component Analysis detects and removes eye blink, muscle, and other artifacts automatically
- Manual - Use your hand-drawn artifact annotations to exclude marked segments from analysis, skipping ICA entirely
- Choose your method before each analysis run via the mode selector
- Configurable bandpass filtering (0.5-45 Hz default)
- Notch filtering (50/60 Hz)
- Automatic resampling to target rate (250 Hz default)
- Bad channel detection and interpolation
- Quality control metrics per condition with accurate epoch rejection reporting
| Domain | Metrics |
|---|---|
| Power Spectral | Absolute & relative band power (Delta, Theta, Alpha1, Alpha2, SMR, Beta2, HiBeta, LowGamma) |
| Connectivity | Weighted Phase-Lag Index (wPLI), network graph metrics |
| Network Metrics | Global efficiency, clustering coefficient, small-worldness, interhemispheric connectivity |
| Complexity | Lempel-Ziv Complexity (LZC) per channel with normalization |
| Asymmetry | Frontal Alpha Asymmetry (FAA), Power Asymmetry Index (PAI) |
| Band Ratios | Theta/Beta, Alpha/Theta (frontal and posterior averages) |
| Alpha Peak | Individual Alpha Frequency (IAF) per channel |
Pattern flagging based on within-subject thresholds:
- ADHD-like: Elevated frontal theta/beta ratio (>2.5)
- Anxiety-like: Elevated frontal beta ratio (>0.25)
- Depression-like: Frontal alpha asymmetry (<-0.15)
- Sleep Dysregulation: Elevated delta power (>0.25)
- Hyper-arousal: Elevated high-beta (>0.15)
- Topomaps per band and condition
- Spectrograms for key channels (Fp1, Fz, Cz, Pz, O1)
- Brain connectivity graphs (wPLI-based)
- Network metrics summary charts
- Alpha peak frequency topomaps
- LZC complexity topomaps
- GPT-4 powered analysis summaries
- Structured interpretation covering all domains
- Cached results for instant retrieval
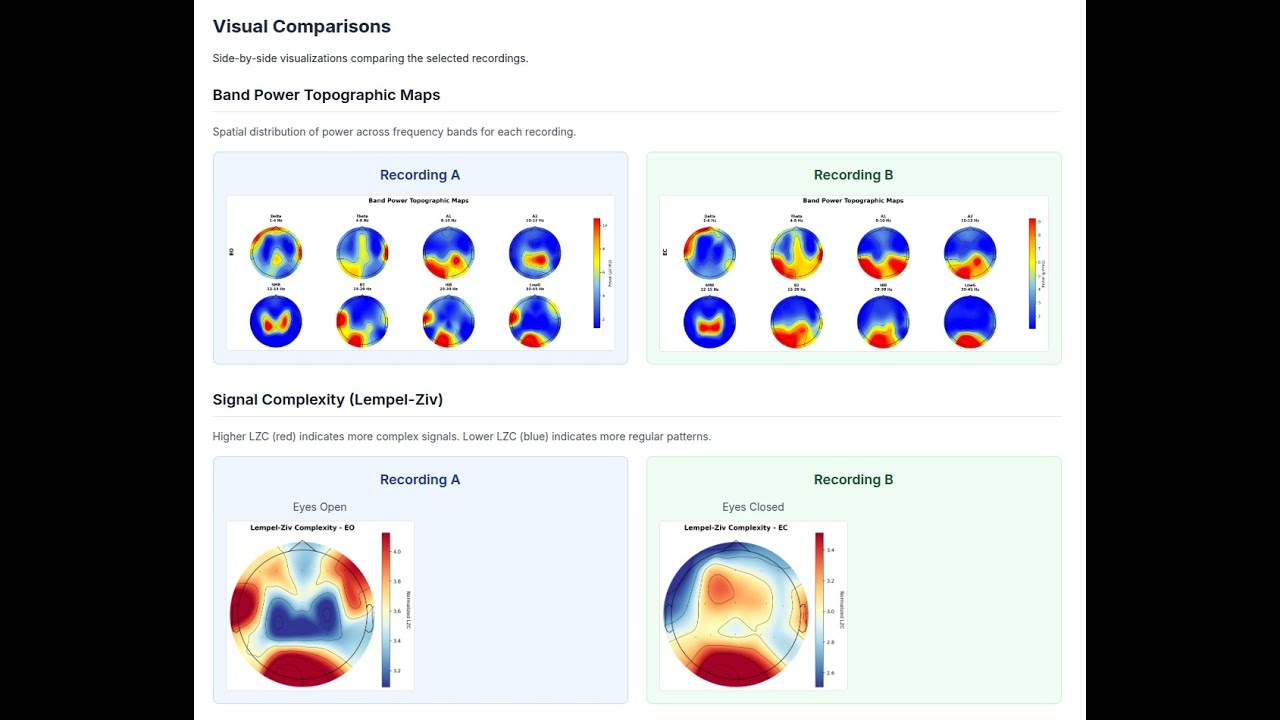
- Compare any two recordings within a project
- Power change analysis (absolute and percent)
- Coherence and asymmetry deltas
- Side-by-side visualization comparison
- AI interpretation for comparative results
- Upload a recording and review it in the EEG viewer
- Optionally mark artifact segments by hand
- Choose ICA or Manual de-artifacting
- Click "Start Analysis" when ready (no auto-trigger on upload)
- Re-analyze at any time with a different method
- Full analysis results as JSON
- Visual assets as PNG images
- All data accessible via API
- Google OAuth authentication
- Project-level access control
- Member sharing and permissions
+----------------+     +----------------+     +----------------+
|    Vercel      |     |   Railway      |     |   Supabase     |
|   Next.js      |---->|    Python      |     |  PostgreSQL    |
|   Frontend     |     |    Worker      |     |   Storage      |
+----------------+     +----------------+     +----------------+
       |                    |                    |
       +--------------------+--------------------+
                     Supabase Auth (Google OAuth)
| Component | Technology |
|---|---|
| Frontend | Next.js 14 (App Router), React, TypeScript, Tailwind CSS |
| Backend | Next.js API Routes |
| Database | Supabase PostgreSQL with Row-Level Security |
| Storage | Supabase Storage (recordings, visuals, exports) |
| Auth | Supabase Auth with Google OAuth |
| Worker | Python Flask/Gunicorn on Railway |
| Signal Processing | MNE-Python, NumPy, SciPy, antropy, scikit-learn |
| Visualization | Plotly, matplotlib, Chart.js |
- Node.js 18+ and npm
- Python 3.11+ (for local development)
- Supabase account
- Google Cloud project (for OAuth)
- Railway account (for Python worker)
- Vercel account (for frontend)
- OpenAI API key (optional, for AI interpretation)
git clone https://github.com/alexdni/squiggly.git
cd squiggly
npm install- Create a new project at supabase.com
- Run the schema SQL:
- Navigate to SQL Editor in Supabase dashboard
- Copy and paste contents of
supabase/schema.sql - Execute the script
- Create Storage buckets:
- Go to Storage in Supabase dashboard
- Create three private buckets:
recordings,visuals,exports
- Enable Google OAuth:
- Go to Authentication > Providers
- Enable Google provider
- Add your Google OAuth credentials
cp .env.example .env.localEdit .env.local:
# Supabase
NEXT_PUBLIC_SUPABASE_URL=https://your-project.supabase.co
NEXT_PUBLIC_SUPABASE_ANON_KEY=your-anon-key
SUPABASE_SERVICE_ROLE_KEY=your-service-role-key

# Worker (configure after Railway deployment)
WORKER_MODE=http
WORKER_SERVICE_URL=https://your-railway-app.railway.app
WORKER_AUTH_TOKEN=your-secure-token

# Optional: AI Interpretation
OPENAI_API_KEY=sk-your-openai-keycd api/workers
pip install -r requirements.txt
cd ../..npm run devOpen http://localhost:3000 in your browser.
- Create new project in Railway
- Connect to your GitHub repository
- Set root directory:
api/workers - Set environment variables:
WORKER_AUTH_TOKEN: Generate a secure random token
- Railway auto-detects
Procfileand deploys with Gunicorn - Copy the generated Railway URL
- Import project in Vercel
- Set environment variables:
NEXT_PUBLIC_SUPABASE_URL=https://your-project.supabase.co
NEXT_PUBLIC_SUPABASE_ANON_KEY=your-anon-key
SUPABASE_SERVICE_ROLE_KEY=your-service-role-key
WORKER_MODE=http
WORKER_SERVICE_URL=https://your-railway-app.railway.app
WORKER_AUTH_TOKEN=your-secure-token
OPENAI_API_KEY=sk-your-key  # Optional
- Deploy
squiggly/
├── app/                          # Next.js App Router
│   ├── api/                      # API routes
│   │   ├── analyses/             # Analysis CRUD, processing & AI interpretation
│   │   ├── projects/             # Project management & comparison
│   │   ├── recordings/           # Recording management & annotations
│   │   └── upload/               # File upload handling
│   ├── dashboard/                # Main dashboard
│   ├── login/                    # Authentication
│   ├── projects/                 # Project pages
│   └── analyses/                 # Analysis detail pages
├── api/workers/                  # Python signal processing
│   ├── analyze_eeg.py            # Main orchestrator
│   ├── preprocess.py             # Signal preprocessing (ICA & manual modes)
│   ├── extract_features.py       # Feature extraction
│   ├── generate_visuals.py       # Visualization generation
│   ├── evaluate_rules.py         # Risk pattern detection
│   └── server.py                 # Flask HTTP server
├── components/                   # React components
│   ├── AnalysisDetailsClient.tsx # Full analysis dashboard with mode selector
│   ├── ComparisonView.tsx        # Recording comparison
│   ├── RawEEGViewer.tsx          # Legacy waveform viewer
│   ├── eeg-viewer/               # New interactive EEG viewer
│   │   ├── EEGViewer.tsx         # Main viewer component
│   │   ├── EEGUnifiedChart.tsx   # Multi-channel chart renderer
│   │   ├── EEGToolbar.tsx        # Gain, filter, and display controls
│   │   ├── EEGTimeSlider.tsx     # Time navigation slider
│   │   ├── EEGAnnotationModal.tsx# Annotation creation dialog
│   │   ├── useEEGData.ts         # File loading hook
│   │   ├── useEEGAnnotations.ts  # Annotation persistence hook
│   │   └── useEEGFilters.ts      # Signal filter hook
│   └── FileUploadZone.tsx        # Upload interface
├── lib/                          # Utilities
│   ├── supabase.ts               # Supabase client
│   ├── eeg-filters.ts            # Browser-side EEG signal filters
│   ├── openai-client.ts          # OpenAI integration
│   ├── worker-client.ts          # Python worker HTTP client
│   ├── prompts/                  # AI prompt templates
│   └── constants.ts              # Configuration defaults
├── types/                        # TypeScript definitions
└── supabase/                     # Database schema
Projects organize recordings for a subject/client. Add optional metadata (age, gender, primary concern).
- Drag and drop EDF or CSV file
- System validates 19-channel 10-20 montage
- Mark EO/EC segments (auto-detected from annotations or filename)
- Analysis is created in pending state (not auto-triggered)
- Use the interactive EEG viewer to inspect the raw waveform
- Adjust filters and gain for clarity
- Draw annotation regions over artifact segments (blinks, muscle, movement)
- Annotations save automatically and persist across sessions
- Select ICA (Automatic) for hands-off artifact removal
- Or select Manual to use only your marked artifact segments
- Click "Start Analysis" to process
Interactive dashboard showing:
- Quality control metrics (artifact rejection rate, bad channels, epochs)
- Band power topomaps
- Spectrograms
- Connectivity graphs
- Network metrics
- Asymmetry indices
- Risk assessment flags
Click "Generate AI Interpretation" for GPT-4 powered analysis summary.
Click "Re-Analyze" to reset to pending, adjust annotations or switch de-artifacting method, and re-run.
Select two recordings to compare:
- Power change analysis
- Delta visualizations
- AI interpretation of changes
Download JSON data via API for further analysis.
GET /api/analyses/[id]- Get analysis detailsPATCH /api/analyses/[id]- Update analysis status or configPOST /api/analyses/[id]/process- Trigger analysis processingGET /api/analyses/[id]/ai-interpretation- Get cached AI interpretationPOST /api/analyses/[id]/ai-interpretation- Generate AI interpretation
GET /api/projects- List user's projectsPOST /api/projects- Create projectGET /api/projects/[id]/compare- Compare two recordings
GET /api/recordings?projectId=...- List recordingsPOST /api/recordings- Create recording entry
GET /api/recordings/[id]/annotations- List annotations for a recordingPOST /api/recordings/[id]/annotations- Create an annotationDELETE /api/recordings/[id]/annotations?annotationId=...- Delete an annotation
This EEG assessment platform is for educational and research use only.
- Heuristic risk flags are based on within-subject percentile thresholds, not normative data
- Results should be interpreted by qualified professionals only
- No clinical claims or diagnostic labels are provided
- Not HIPAA compliant - do not upload identifiable health data
For self-hosted local deployment without cloud dependencies, see the docker branch.
Features:
- All-in-one container (Next.js + Python + PostgreSQL)
- No internet required
- Local file storage
- Session-based authentication
Contributions are welcome! Please open an issue or pull request.
MIT License - see LICENSE file for details.
- Built with MNE-Python for EEG signal processing
- UI components from shadcn/ui
- Designed for clinical neurophysiologists and researchers