A unified modular hypervisor based on ArceOS.


English | 中文
AxVisor is a Hypervisor implemented based on the ArceOS unikernel framework. Its goal is to leverage the basic operating system functionalities provided by ArceOS as a foundation to build a unified and componentized Hypervisor.
Unified means using the same codebase to support three architectures—x86_64, Arm (aarch64), and RISC-V—maximizing the reuse of architecture-agnostic code and simplifying development and maintenance efforts.
Componentized means that the Hypervisor's functionalities are decomposed into multiple independently usable components. Each component implements a specific function, and components communicate through standardized interfaces to achieve decoupling and reusability.
The software architecture of AxVisor is divided into five layers as shown in the diagram below. Each box represents an independent module, and the modules communicate with each other through standard interfaces.
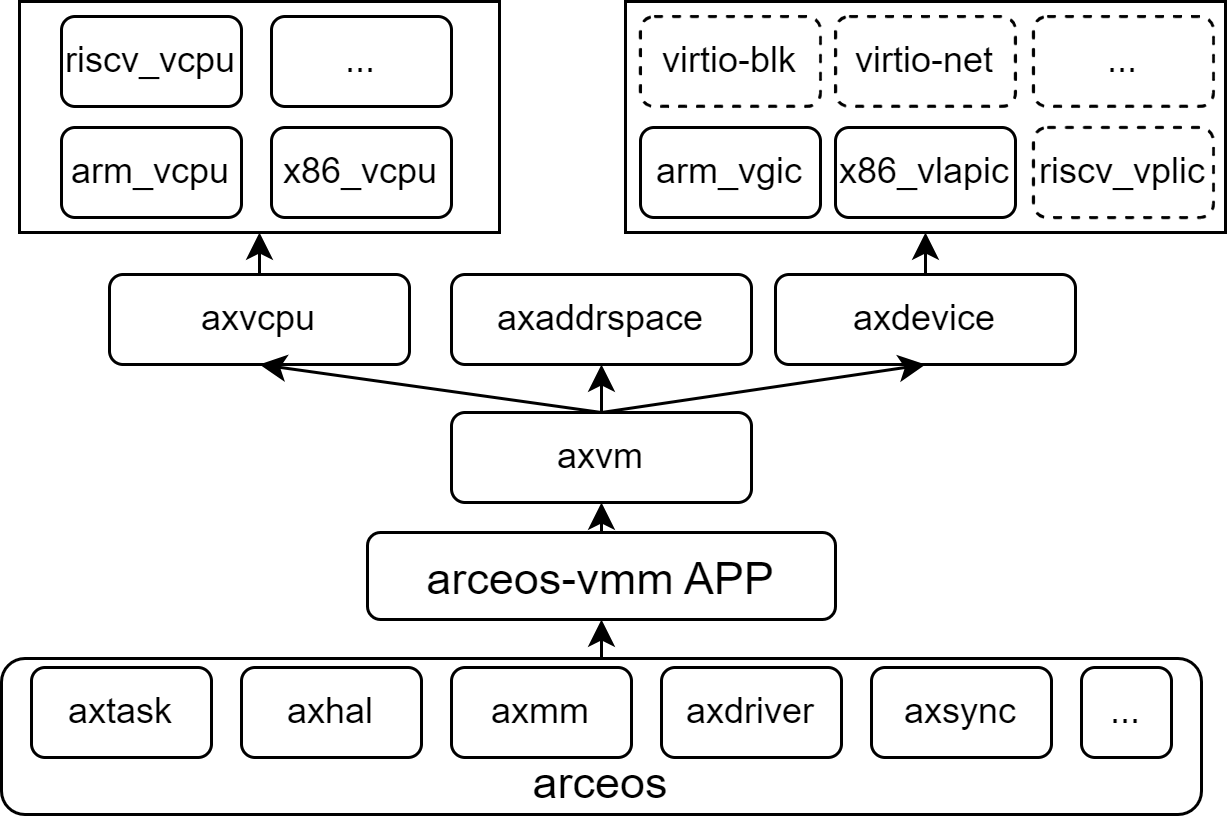
The complete architecture description can be found in the documentation.
Currently, AxVisor has been verified on the following platforms:
- QEMU ARM64 virt (qemu-max)
- Rockchip RK3568 / RK3588
- PhytiumPi
Currently, AxVisor has been verified in scenarios with the following systems as guests:
AxVisor provides an interactive shell interface for managing virtual machines and file operations.
For detailed information about shell features, commands, and usage, see: Shell模块介绍.md
After AxVisor starts, it loads and starts the guest based on the information in the guest configuration file. Currently, AxVisor supports loading guest images from a FAT32 file system and also supports binding guest images to the hypervisor image through static compilation (using include_bytes).
AxVisor is written in the Rust programming language, so you need to install the Rust development environment following the instructions on the official Rust website. Additionally, you need to install cargo-binutils to use tools like rust-objcopy and rust-objdump.
cargo install cargo-binutilsIf necessary, you may also need to install musl-gcc to build guest applications.
Since guest configuration is a complex process, AxVisor chooses to use toml files to manage guest configurations, which include the virtual machine ID, virtual machine name, virtual machine type, number of CPU cores, memory size, virtual devices, and passthrough devices.
-
In the source code's
./config/vmsdirectory, there are some example templates for guest configurations. The configuration files are named in the format<os>-<arch>-board_or_cpu-smpx, where:<os>is the guest operating system name<arch>is the architectureboard_or_cpuis the name of the hardware development board or CPU (different strings are concatenated with_)smpxrefers to the number of CPUs allocated to the guest, wherexis the specific value- The different components are concatenated with
-to form the whole name
-
Additionally, you can also use the axvmconfig tool to generate a custom configuration file. For detailed information, please refer to axvmconfig.
Loading from the filesystem refers to the method where the AxVisor image, Linux guest image, and its device tree are independently deployed in the filesystem on the storage. After AxVisor starts, it loads the guest image and its device tree from the filesystem to boot the guest.
-
Execute script to download and prepare NimbOS image.
./scripts/nimbos.sh --arch aarch64
-
Execute
./axvisor.sh run --plat aarch64-generic --features fs,ept-level-4 --arceos-args BUS=mmio,BLK=y,DISK_IMG=tmp/nimbos-aarch64.img,LOG=info --vmconfigs configs/vms/nimbos-aarch64-qemu-smp1.tomlto build AxVisor and start it in QEMU. -
After that, you can directly run
./axvisor.sh runto start it, and modify.hvconfig.tomlto change the startup parameters.
TODO
Loading from memory refers to a method where the AxVisor image, guest image, and its device tree are already packaged together during the build phase. Only AxVisor itself needs to be deployed in the file system on the storage device. After AxVisor starts, it loads the guest image and its device tree from memory to boot the guest.
-
Prepare working directory
mkdir -p tmp
cp configs/vms/linux-aarch64-qemu-smp1.toml tmp/
cp configs/vms/linux-aarch64-qemu-smp1.dts tmp/
-
See Linux build help to get the guest Image and rootfs.img, then copy them to the
tmpdirectory. -
Execute
dtc -O dtb -I dts -o tmp/linux-aarch64-qemu-smp1.dtb tmp/linux-aarch64-qemu-smp1.dtsto build the guest device tree file -
Execute
./axvisor.sh defconfig, then edit the.hvconfig.tomlfile, set thevmconfigsitem to your guest machine configuration file path, with the following content:arceos_args = [ "BUS=mmio", "BLK=y", "MEM=8g", "LOG=debug", "QEMU_ARGS=\"-machine gic-version=3 -cpu cortex-a72 \"", "DISK_IMG=\"tmp/rootfs.img\"", ] vmconfigs = [ "tmp/linux-aarch64-qemu-smp1.toml"]
-
Execute
./axvisor.sh runto build AxVisor and start it in QEMU.
TODO
Feel free to fork this repository and submit a pull request.
You can refer to these discussions to gain deeper insights into the project's ideas and future development direction.
To contribute to AxVisor, you can follow these steps:
- Fork the repository on GitHub.
- Clone your forked repository to your local machine.
- Create a new branch for your feature or bug fix.
- Make your changes and commit them with clear messages.
- Push your changes to your forked repository.
- Open a pull request against the main branch of the original repository.
To develop crates used by AxVisor, you can use the following command to build and run the project:
cargo install cargo-lpatch
cargo lpatch -n deps_crate_name
Then you can modify the code in the crates/deps_crate_name directory, and it will be automatically used by AxVisor.
This project exists thanks to all the people who contribute.
AxVisor uses the following open-source license:
- Apache-2.0
- MulanPubL-2.0
- MulanPSL2
- GPL-3.0-or-later