A CLI that turns your Project's Documentation into an autonomous local task management and project implementation system.
Initially developped for Cline with Anthropic's Claude by @eyaltoledano
Forked by @JamesCherished to work with Roo Code and Cline.
Cursor branch : aims to be up-to-date with the latest releases by @eyaltoledano at eyaltoledano/claude-task-master/main.
Roo Code as a Custom Mode branch : fork of eyaltoledano/claude-task-master/main working with Roo by creating a Roo Custom Mode with the prompts in Task Master Prompts.md, using task-master as is ('npm i task-master-ai').
Roo Code AI Task Master branch (preferred) : custom package modified specifically for Roo Code, to 'git clone' and run locally with ('npm install').
Can be used with the Roo Custom Mode (with the prompts in Task Master Prompts.md )
Roo Code for OpenRouter branch : this repo enables the choice to use OpenRouter as replacement for Anthropic's Claude and/or Perplexity's Sonar at the user will, by setting the default provider and API in the .env.
Benefits:
- More reliable API access
- Better rate limits
- Consistent performance
- Lower costs and better caching
- 50+ free models
- most SOTA models
Cline branch : this repo enables the use of eyaltoledano/claude-task-master/main for Cline. Further implementation will be made soon. But I recommend you try out Roo Code anyway instead, (at least for now ;)
Graduate from building cute little apps to ambitious projects without overwhelming yourself or the agent.
A custom script that intelligently breaks down massive PRDs into clear, ordered, dependency-aware tasks: • Reliable, sequential implementation • Eliminates overwhelm/boosts clarity

- Task Master
- Table of Contents:
- QuickStart - How to Use
- Task Master AI Docs
To start using Roo-AI Task Master, follow these steps:
-
Clone the repository: Clone the forked repository to your local machine and open it in your terminal.
-
Install dependencies: Run
npm install(oryarn installorpnpm install) to install the project's dependencies. -
Create a Roo Custom Code from the extension by copy/pasting the prompts in Task Master Prompts.md or downloading .clinerules-taskmaster and moving it to the .vscode directory
-
(optional) : Set up your API keys in the .env created after you run npm install (Only if you want to use AI to parse your PRD and to deep research tasks ; Roo can also work without these features)
That's it! Now open an existing or new workspace and start chatting with Roo! (Don't forget to select the Task-Master mode)

Note : if no API keys are set, certain terminal commands won't work (like parse), but Roo will continue working despite the failed commands, and it won't affect the end result that much.
Roo will use the 'npm i task-master-ai' and 'roo-task-master init' commands as it understands you're starting a new project. The Custom Mode now programs Roo to use the task-master script to autonomously create, track, edit and close tasks and subtasks, based on the plan you decide together or already wrote in your Readme.me or project's documentation. It's probably best you state clearly this is a new project in the 1st Roo task prompt.
For the next tasks, it won't run these commands as it understands you're working on an existing project. If you want to try AI Task Master on an existing project, just tell Roo. You can also run the commands yourself. You can run npm i -g task-master-ai to install AI Task Master globally ; by default, Roo only installs it within your project. Roo always starts a new Roo task with task-master list to check if there's already a plan to resume. It's probably best you state it's an already existing project, already using task-master if that's the case, in the 1st Roo task prompt.
You don't need to use Architect mode anymore, as it is embedded in this custom mode : It is automatically enabled at the beginning of a Roo task if there is no documentation or task implementation plan in your prompt or project documentation, to create one for you to review. You can tweak it, refine it, or detail it by prompting. Once you accept, Roo gets to work right away, as if it was in Code mode. If Roo finds documentation or plans when you starts its Roo task, it automatically gets to work, either resuming AI Task Master tasks, or setting it up accordingly.
A PRD is a Products Requirements Documentation text file for complex projects. Task Master is able to work with dense PRD, but in this implementation, it can also work with just a Readme or anything your write in /docs. If you start your project from scratch, Roo Code will guide you through creating your project's documentation automatically. I invite you to approach the project designing phase as a collaborative brainstorming.
Roo has access to all the Task Master CLI commands in his prompt and knows where to use which, autonomously. You are free to run any of these commands in you terminal yourself at anytime without informing Roo. The full list of these commands is written below, as we resume the original README from @eyaltoledano.
To configure your API providers, add at least Claude or Openrouter. Then, you can add Perplexity if you want. OpenRouter configuration can replace Perplexity for research if Perplexity is not setup, or commented out.
- Get your API key from https://console.anthropic.com
- Add to .env:
ANTHROPIC_API_KEY=your_api_key_here
AI_PROVIDER=CLAUDE
- Get your API key from https://www.perplexity.ai
- Add to .env:
PERPLEXITY_API_KEY=your_api_key_here
AI_PROVIDER=PERPLEXITY
- Get your API key from https://openrouter.ai
- Add to .env:
OPENROUTER_API_KEY=your_api_key_here
OPENROUTER_PARSING_MODEL=anthropic/claude-3-sonnet  # Model for task parsing
OPENROUTER_RESEARCH_MODEL=anthropic/claude-3-sonnet # Model for research tasks
AI_PROVIDER=OPENROUTER
Note: If no AI_PROVIDER is specified, OpenRouter will be used by default when its API key is present.
Benefits:
- More reliable API access
- Better rate limits
- Consistent performance
- Lower costs and better caching
- 50+ free models
- most SOTA models
The current implementation hardcodes Claude, if you want to use OpenRouter instead, you may need to specify it when running the commands. With the most advanced model Roo checks which provider is set in .env by you to know when to use OpenRouter-specific commands. Don't hesitate to remind him if needed.
To parse PRDs using OpenRouter:
OPENROUTER_API_KEY=your_key_here npm run parse-prd-openrouter path/to/prd.txtYou have 2 options
- Download .clinerules-task-master from this repo and add it to your Roo extension settings in .vscode
- Copy the prompts at the end of this README to create the custom mode yourself (preferred), and tweak it if you want
# Install globally
npm i -g task-master-ai

# OR install locally within your project
npm i task-master-ai# If installed globally
task-master init
# If installed locally
npx task-master-initThis will prompt you for project details and set up a new project with the necessary files and structure.
After installing the package globally, you can use these CLI commands from any directory:
# Initialize a new project
task-master init

# Parse a PRD and generate tasks
task-master parse-prd your-prd.txt

This will:
- Parse your PRD document
- Generate a structured `tasks.json` file with tasks, dependencies, priorities, and test strategies
- The agent will understand this process due to the Cursor rules


# List all tasks
task-master list

# Show the next task to work on
task-master next

# Generate task files
task-master generate
task-master generateThe script can be configured through environment variables in a .env file at the root of the project:
ANTHROPIC_API_KEY: Your Anthropic API key for ClaudeMODEL: Specify which Claude model to use (default: "claude-3-7-sonnet-20250219")MAX_TOKENS: Maximum tokens for model responses (default: 4000)TEMPERATURE: Temperature for model responses (default: 0.7)PERPLEXITY_API_KEY: Your Perplexity API key for research-backed subtask generationPERPLEXITY_MODEL: Specify which Perplexity model to use (default: "sonar-medium-online")DEBUG: Enable debug logging (default: false)LOG_LEVEL: Log level - debug, info, warn, error (default: info)DEFAULT_SUBTASKS: Default number of subtasks when expanding (default: 3)DEFAULT_PRIORITY: Default priority for generated tasks (default: medium)PROJECT_NAME: Override default project name in tasks.jsonPROJECT_VERSION: Override default version in tasks.json
index.js is the main entry point for the task-master CLI, providing commands like init, list, next, and generate. It also exports functions for programmatic use.
bin/task-master.js serves as the main entry point for the globally installed task-master CLI, mirroring the commands available in index.js but with more detailed option handling. It essentially acts as a wrapper around the dev.js script, providing a user-friendly command-line interface.
Other .md files provide additional context:
- scripts/README.md (and assets/scripts_README.md): Provides in-depth documentation of the
dev.jsscript, including all commands and options. This is more technical and developer-focused. - tests/README.md: Describes the testing strategy and how to run tests.
- Node.js 14.0.0 or higher (recommended: LTS version)
- npm (comes with Node.js) or yarn
Linux (Debian/Ubuntu):
curl -fsSL https://deb.nodesource.com/setup_lts.x | sudo -E bash -
sudo apt-get install -y nodejs
Linux (RHEL/CentOS):
curl -fsSL https://rpm.nodesource.com/setup_lts.x | sudo bash -
sudo yum install -y nodejs
macOS (using Homebrew):
brew install nodeWindows: Download installer from Node.js official website
Verify Installation:
node --version
npm --version- OpenRouter API
- Anthropic API key (Claude API)
- Anthropic SDK version 0.39.0 or higher
- OpenAI SDK (for Perplexity API integration, optional)
- This package uses ES modules. Your package.json should include
"type": "module". - The Anthropic SDK version should be 0.39.0 or higher.
The agent is pre-configured (via the rules file) to follow this workflow:
Ask the agent to list available tasks:
What tasks are available to work on next?
The agent will:
- Run
task-master listto see all tasks - Run
task-master nextto determine the next task to work on - Analyze dependencies to determine which tasks are ready to be worked on
- Prioritize tasks based on priority level and ID order
- Suggest the next task(s) to implement
When implementing a task, the agent will:
- Reference the task's details section for implementation specifics
- Consider dependencies on previous tasks
- Follow the project's coding standards
- Create appropriate tests based on the task's testStrategy
You can ask:
Let's implement task 3. What does it involve?
Before marking a task as complete, verify it according to:
- The task's specified testStrategy
- Any automated tests in the codebase
- Manual verification if required
When a task is completed, tell the agent:
Task 3 is now complete. Please update its status.
The agent will execute:
task-master set-status --id=3 --status=doneIf during implementation, you discover that:
- The current approach differs significantly from what was planned
- Future tasks need to be modified due to current implementation choices
- New dependencies or requirements have emerged
Tell the agent:
We've changed our approach. We're now using Express instead of Fastify. Please update all future tasks to reflect this change.
The agent will execute:
task-master update --from=4 --prompt="Now we are using Express instead of Fastify."This will rewrite or re-scope subsequent tasks in tasks.json while preserving completed work.
For complex tasks that need more granularity:
Task 5 seems complex. Can you break it down into subtasks?
The agent will execute:
task-master expand --id=5 --num=3You can provide additional context:
Please break down task 5 with a focus on security considerations.
The agent will execute:
task-master expand --id=5 --prompt="Focus on security aspects"You can also expand all pending tasks:
Please break down all pending tasks into subtasks.
The agent will execute:
task-master expand --allFor research-backed subtask generation:
Please break down task 5 using research-backed generation.
The agent will execute:
# Using Perplexity (default)
task-master expand --id=5 --research

# Using OpenRouter alternative
OPENROUTER_API_KEY=your_key_here npm run expand-research -- --expand --id=5
## Command Reference

Here's a comprehensive reference of all available commands:

### Parse PRD
```bash
# Parse a PRD file and generate tasks
task-master parse-prd <prd-file.txt>

# Limit the number of tasks generated
task-master parse-prd <prd-file.txt> --num-tasks=10
# List all tasks
task-master list

# List tasks with a specific status
task-master list --status=<status>

# List tasks with subtasks
task-master list --with-subtasks

# List tasks with a specific status and include subtasks
task-master list --status=<status> --with-subtasks# Show the next task to work on based on dependencies and status
task-master next# Show details of a specific task
task-master show <id>
# or
task-master show --id=<id>
# View a specific subtask (e.g., subtask 2 of task 1)
task-master show 1.2# Update tasks from a specific ID and provide context
task-master update --from=<id> --prompt="<prompt>"# Generate individual task files from tasks.json
task-master generate# Set status of a single task
task-master set-status --id=<id> --status=<status>
# Set status for multiple tasks
task-master set-status --id=1,2,3 --status=<status>
# Set status for subtasks
task-master set-status --id=1.1,1.2 --status=<status>When marking a task as "done", all of its subtasks will automatically be marked as "done" as well.
# Expand a specific task with subtasks
task-master expand --id=<id> --num=<number>

# Expand with additional context
task-master expand --id=<id> --prompt="<context>"

# Expand all pending tasks
task-master expand --all

# Force regeneration of subtasks for tasks that already have them
task-master expand --all --force

# Research-backed subtask generation for a specific task
task-master expand --id=<id> --research

# Research-backed generation for all tasks
task-master expand --all --research# Clear subtasks from a specific task
task-master clear-subtasks --id=<id>
# Clear subtasks from multiple tasks
task-master clear-subtasks --id=1,2,3
# Clear subtasks from all tasks
task-master clear-subtasks --all# Analyze complexity of all tasks
task-master analyze-complexity
# Save report to a custom location
task-master analyze-complexity --output=my-report.json
# Use a specific LLM model
task-master analyze-complexity --model=claude-3-opus-20240229
# Set a custom complexity threshold (1-10)
task-master analyze-complexity --threshold=6
# Use an alternative tasks file
task-master analyze-complexity --file=custom-tasks.json
# Use AI for research-backed complexity analysis
```bash
# Using Perplexity (default)
task-master analyze-complexity --research
# Using OpenRouter alternative
OPENROUTER_API_KEY=your_key_here npm run analyze-complexity-research# Display the task complexity analysis report
task-master complexity-report
# View a report at a custom location
task-master complexity-report --file=my-report.json# Add a dependency to a task
task-master add-dependency --id=<id> --depends-on=<id>
# Remove a dependency from a task
task-master remove-dependency --id=<id> --depends-on=<id>
# Validate dependencies without fixing them
task-master validate-dependencies
# Find and fix invalid dependencies automatically
task-master fix-dependencies# Add a new task using AI
task-master add-task --prompt="Description of the new task"
# Add a task with dependencies
task-master add-task --prompt="Description" --dependencies=1,2,3
# Add a task with priority
task-master add-task --prompt="Description" --priority=highThe analyze-complexity command:
- Analyzes each task using AI to assess its complexity on a scale of 1-10
- Recommends optimal number of subtasks based on configured DEFAULT_SUBTASKS
- Generates tailored prompts for expanding each task
- Creates a comprehensive JSON report with ready-to-use commands
- Saves the report to scripts/task-complexity-report.json by default
The generated report contains:
- Complexity analysis for each task (scored 1-10)
- Recommended number of subtasks based on complexity
- AI-generated expansion prompts customized for each task
- Ready-to-run expansion commands directly within each task analysis
The complexity-report command:
- Displays a formatted, easy-to-read version of the complexity analysis report
- Shows tasks organized by complexity score (highest to lowest)
- Provides complexity distribution statistics (low, medium, high)
- Highlights tasks recommended for expansion based on threshold score
- Includes ready-to-use expansion commands for each complex task
- If no report exists, offers to generate one on the spot
The expand command automatically checks for and uses the complexity report:
When a complexity report exists:
- Tasks are automatically expanded using the recommended subtask count and prompts
- When expanding all tasks, they're processed in order of complexity (highest first)
- Research-backed generation is preserved from the complexity analysis
- You can still override recommendations with explicit command-line options
Example workflow:
# Generate the complexity analysis report with research capabilities
task-master analyze-complexity --research

# Review the report in a readable format
task-master complexity-report

# Expand tasks using the optimized recommendations
task-master expand --id=8
# or expand all tasks
task-master expand --allThe next command:
- Identifies tasks that are pending/in-progress and have all dependencies satisfied
- Prioritizes tasks by priority level, dependency count, and task ID
- Displays comprehensive information about the selected task:
- Basic task details (ID, title, priority, dependencies)
- Implementation details
- Subtasks (if they exist)
- Provides contextual suggested actions:
- Command to mark the task as in-progress
- Command to mark the task as done
- Commands for working with subtasks
The show command:
- Displays comprehensive details about a specific task or subtask
- Shows task status, priority, dependencies, and detailed implementation notes
- For parent tasks, displays all subtasks and their status
- For subtasks, shows parent task relationship
- Provides contextual action suggestions based on the task's state
- Works with both regular tasks and subtasks (using the format taskId.subtaskId)
- Start with a detailed PRD: The more detailed your PRD, the better the generated tasks will be.
- Review generated tasks: After parsing the PRD, review the tasks to ensure they make sense and have appropriate dependencies.
- Analyze task complexity: Use the complexity analysis feature to identify which tasks should be broken down further.
- Follow the dependency chain: Always respect task dependencies - the Cursor agent will help with this.
- Update as you go: If your implementation diverges from the plan, use the update command to keep future tasks aligned with your current approach.
- Break down complex tasks: Use the expand command to break down complex tasks into manageable subtasks.
- Regenerate task files: After any updates to tasks.json, regenerate the task files to keep them in sync.
- Communicate context to the agent: When asking the Cursor agent to help with a task, provide context about what you're trying to achieve.
- Validate dependencies: Periodically run the validate-dependencies command to check for invalid or circular dependencies.
I've just initialized a new project. I have a PRD at scripts/prd.txt.
Can you help me parse it and set up the initial tasks?
What's the next task I should work on? Please consider dependencies and priorities.
I'd like to implement task 4. Can you help me understand what needs to be done and how to approach it?
I need to regenerate the subtasks for task 3 with a different approach. Can you help me clear and regenerate them?
We've decided to use MongoDB instead of PostgreSQL. Can you update all future tasks to reflect this change?
I've finished implementing the authentication system described in task 2. All tests are passing.
Please mark it as complete and tell me what I should work on next.
Can you analyze the complexity of our tasks to help me understand which ones need to be broken down further?
Can you show me the complexity report in a more readable format?
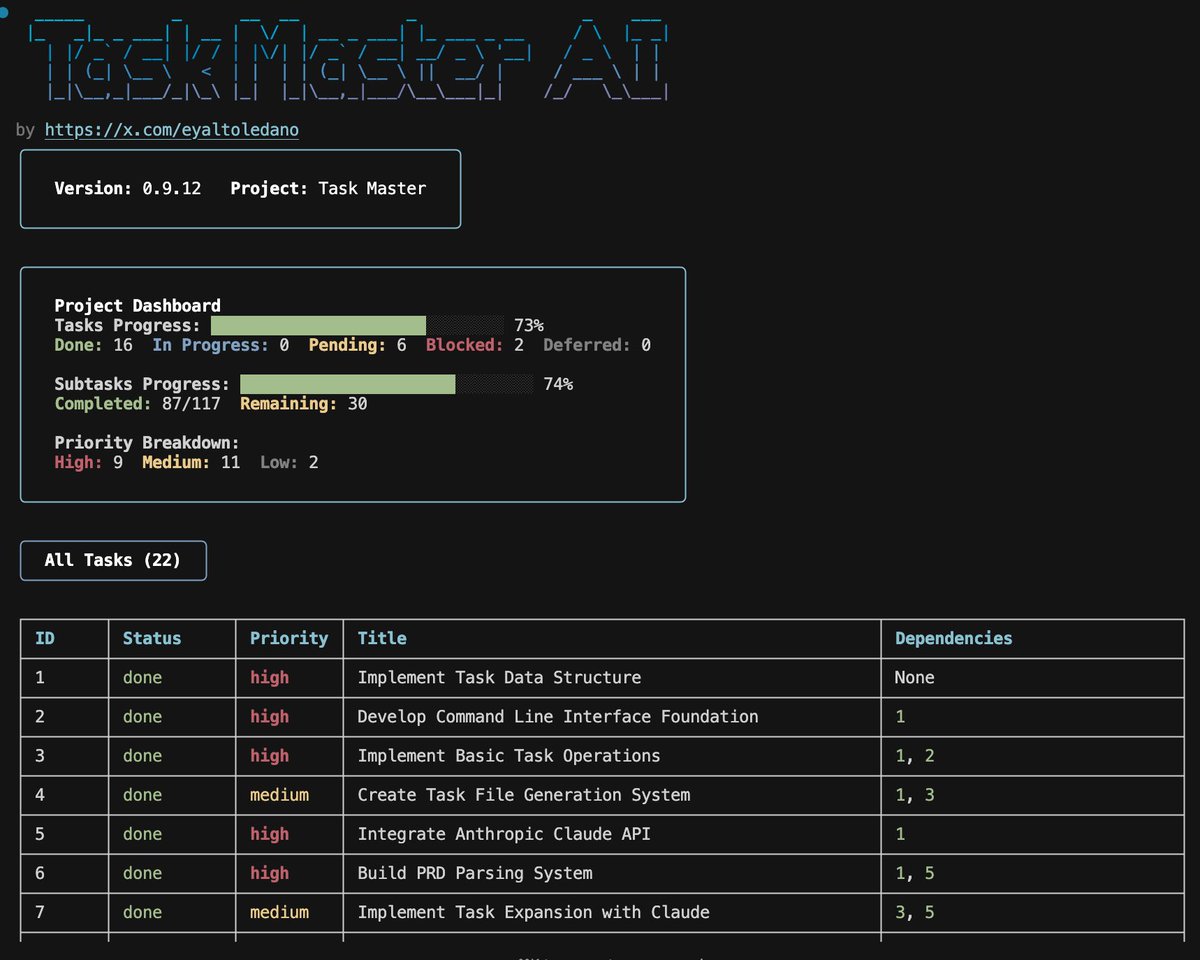
Tasks in tasks.json have the following structure:
id: Unique identifier for the task (Example:1)title: Brief, descriptive title of the task (Example:"Initialize Repo")description: Concise description of what the task involves (Example:"Create a new repository, set up initial structure.")status: Current state of the task (Example:"pending","done","deferred")dependencies: IDs of tasks that must be completed before this task (Example:[1, 2])- Dependencies are displayed with status indicators (✅ for completed, ⏱️ for pending)
- This helps quickly identify which prerequisite tasks are blocking work
priority: Importance level of the task (Example:"high","medium","low")details: In-depth implementation instructions (Example:"Use GitHub client ID/secret, handle callback, set session token.")testStrategy: Verification approach (Example:"Deploy and call endpoint to confirm 'Hello World' response.")subtasks: List of smaller, more specific tasks that make up the main task (Example:[{"id": 1, "title": "Configure OAuth", ...}])
Try running it with Node directly:
node node_modules/claude-task-master/scripts/init.jsOr clone the repository and run:
git clone https://github.com/eyaltoledano/claude-task-master.git
cd claude-task-master
node scripts/init.js